CS2 Dust 2 Smokes
Contents

This guide covers the essential Dust 2 smokes map spots that you can use to win more rounds and create a greater impact single-handedly. We have broken down all the key smoke strategies on Dust 2, along with explanations of specific grenade-throwing techniques to enhance your gameplay.
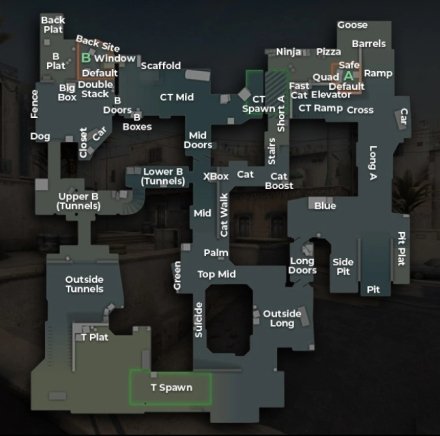
Since most maps have plenty of opened Sky Boxes, players can throw Smokes across half of the map with precise landings. However, before diving into the details of how to smoke on Dust 2 effectively, we recommend reviewing the Dust 2 callouts for a better overall map understanding.

Dust 2 A Smokes
The openness of A Site on Dust 2 brings a lot of opportunities for both sides to utilize effective smoke lineups. With the right techniques, it’s possible to block the Mid Doors and even Tunnels Exit efficiently. Additionally, to use the best tactics and spreads, we recommend that you check out Dust 2 tips for improving team skills.
Long Car to Long Doors
If the battle for Long repeats from round to round, there are a few early-timing Dust 2 smokes that can significantly increase CTs’ chances of securing the position. To execute the simplest one, stand by the back wheel of the Long Car, aim as shown in the video, and left-click throw. With the earliest possible timing, you will block vision from the Long Doors and prevent an early Long rush by Ts.
A Site to Short Stairs
This is the important Dust 2 short smoke for the A Site players who need to block vision on Short Stairs. Stand in the corner behind the Single/Safe Box, aim as shown in the video, and simply throw the grenade.
A Site to Mid Doors
Being the A-Site anchor in CS2 doesn’t mean you can only help the nearby teammates. You can provide assistance to your Mid-playing colleagues by executing the alternative to the Dust 2 Mid Door smoke, which will block the Mid execution or B Site split. So, when your teammates on the Mid need help, or you want to fake Mid presence right from A Ramp — use this easy lineup.
A Site to B Tunnels Exit
While it may seem weird, an A-site player can support his B-site teammates or fake presence in the late game with one of the longest-flying smokes on the map. The lineup may seem pretty complex, but after a few tries, you’ll see that right aiming, a few steps, and jumpthrow are an easy combination that pays off.
Dust 2 B Smokes
B Site is less contested on Dust 2, and there are only a few interesting spots. That is, the majority of the smokes here will be useful for Terrorists before executions or for fake moves.
Upper Tunnels to B Doors
One of the simplest Dust 2 smoke lineups is placing a grenade to block vision through the B Doors, which is usually done from the Upper Tunnels. Come to its lock, aim in the roof gap, and simply throw the nade.
Outside Tunnel to B Doors
With opened skyboxes, Dust 2 has become a more T-sided map. Thus, they have two best smoke spots on Dust 2 — at the B Doors and Window. This one is for the Doors, and it should be thrown first, as it flies a bit longer to land.
Outside Tunnel to B Window
With a pretty simple spot and lineup, this smoke should be combined with the previous one before B Site execution. However, even if your team’s tactic for the round is to push A Site, with these two smokes, a single person at the Outside Tunnel can make a perfect fake.
B Doors to Short
Being a Mid or B-site player, helping your teammates on A site can be a tough task as it requires long rotation and dangerous Middle crossing. However, you can still provide support by covering the A Short from the spot near the B Doors.
Dust 2 Mid Smokes
Despite being the center part of the map, the Middle lineups for smokes are mostly used for local battles, with limited application to other map areas.
X-Box to CT Spawn
With CS2 Dust 2 smoke, you have far better chances to execute the Split B tactic. Throw a nade from the X-Box corner, aiming at one of the dots on the depicted wall. However, this lineup leaves gaps if CTs know how to boost themselves on the CT-Spawn boxes. Since the physics of smoke in CS2 is different, you’ll need to employ an advanced lineup for the grenade to block enemy vision completely.
Easy Lineup:
Advanced Lineup (crouch, then jumpthrow):
Top Mid to B Window
Another great option available, because skyboxes are no longer a thing, is to deliver a B Window Dust 2 smoke from the safe position on the Top Mid. This pretty simple lineup requires pressing Shift and taking a few steps before doing a jumpthrow, but its effectiveness should not be understated. It will surely help to fake B execute or help your teammates coming from the B Tunnels Exit.
CT Mid to Tunnels Exit
The B Site retaking usually starts by isolating the Upper Tunnels, which can be done even with smoke in the B Doors obstructing direct vision. Standing in the corner near the Mid Truck, aim as shown and make a jumpthrow; the textures will react on your jump and send the grenade into the Tunnels Exit.
Mid Doors to Mid Doors
In the Global Offensive version, the Mid Doors blocking was a pretty tough task, which also required jumping so the Counter-Terrorists couldn’t see the legs. That’s why many players used Dust 2 XBox smoke to make things easier. However, the renewed physics of CS2 grenades changes the meta. Use this pretty simple left+right click throw to cover every step for your rotations from the Cat to Lower Tunnels and vice versa.
CT Smokes on Dust 2
Throwing any efficient smoke grenade right from the CT Spawn on Dust 2 is quite a challenge, so the lineups here focus only on nearby positions.
Elevator to Long Doors
If your team has poor spawns for an early Long Corner fight, taking it with flashbangs and incendiary can be dangerous as the T sniper can be first to the spot and make an easy kill. Dropping this smoke will help your team to arrive for the duel without the danger of being controlled from the Doors, with a safe incendiary behind the Blue Box to finish the job.
CT Spawn to Suicide
Sometimes, a T sniper plays too well in the Suicide position, and blocking his vision can resolve the problem without the need to learn Dust 2 wallbang spots. Another purpose of this nade is to prepare for the Top Mid push, which can make Terrorists' lives pretty tough without an additional spot to control the aggression.
CT Spawn to Deep Upper Tunnels
There are not so many grenades that are thrown near the Counter-Terrorists spawn, and this CT smoke on Dust 2 removed skyboxes made available. It should be combined with the teammates that will push the Upper Tunnels from the B Site and Lower. A well-coordinated combination of this push with flashbangs and incendiaries can stop a B rush from Ts before it begins.
Dust 2 T Side Smokes
Unlike CTs, Terrorists’ spawn zones allow for more versatile smoke usage. Moreover, depending on the strategy, Terrorists have a pretty diverse CS2 Dust 2 smokes map to execute.
T Spawn to X-Box
Come to the wall at the T-Spawn (so you can see a part of the wall left to the Suicide) and aim as shown in the video below. A simple jumpthrow will provide reliable coverage for fast Catwalk and Short push or other tactics that involve isolating a CT sniper with this Dust 2 Mid smoke.
T Spawn to Long Corner
This is one of the CS2 Dust 2 smoke lineups for the start of a round when you want to block CTs’ vision on the Long Corner. Since this smoke can be thrown at the very first seconds of the round, it makes the life of CTs on Long much harder. Your teammates pushing the Long Doors will appreciate your knowledge of this smoke spot.
T Plat to B Doors
When your team decides to execute a fast B site push, using the lineup for the B Doors smoke is often too slow, while a CT sniper on Middle can make your B Tunnels exit dangerous. The lack of skyboxes in CS2 makes it possible to land smokes at the early timings, and this one is no exception. So, compared to CS:GO, in Counter-Strike 2 you can throw it from the T Plat at early timings to close the Door gap and make the execution much safer.
Other Useful CS Dust 2 Smokes
The Long and Cat/Short areas deserve separate sections due to their strategic importance.
Long Blue Box to Cross
After taking Long & Pit positions, Ts usually attempt to take A Site quickly, and a proper Cross Smoke makes this task much easier. Aim over the painted tooth, run, and then click a throw button to execute the Cross smoke—though it may leave gaps occasionally. Since CS2 smokes are larger and more responsive than in CS:GO, professional teams frequently use this smoke. The lineup presented below is one of the easiest but requires a left+right click jumpthrow, so there will be no gaps in the cross.
Long Doors to CT Spawn/Cross
An advanced variation of the previous smoke position covers the CT Spawn and Mid more effectively but does not provide cover from the enemies on the Short—so be sure to combine it with a Short smoke. Coming from the Long Doors, you should find a specific wall to the left, come close to its middle, and throw the smoke, as demonstrated in the video.
Long Doors to CT Spawn
The CT Spawn smoke has a clear use case — the player can throw a smoke near the X-Box to cover their Terrorist teammates organizing a B Split or Mid execution. Throwing it from the Long Doors will likely confuse many CTs as it is a pretty unusual spot for smoke, making it a strong option in clutch situations.
Cat to Fast Cat (Short)
An A Site execution from the Short can either be a rapid play focused on the pace or a carefully planned strategy. This and the following CS2 Dust 2 smokes will focus on the latter option, creating a much safer space for your push to the bomb plant. Moreover, this grenade blocks the vision of Ramp and Long Car defenders.
Stairs to Short
By combining this smoke with the previous one, your approach to A Site will become much safer, allowing you access to Ninja. If both those grenades are executed perfectly, they will also cover CT Spawn. If you have teammates going Long — a successful A Site execution is almost guaranteed.


