How to Make an Autoexec for CS2: How to Find, Tune, Deploy

The question of how to make an Autoexec for CS2 remains as relevant in the latest version of the game as it was in all the previous ones. Manually entering console commands to set up comfortable settings is a long and tiresome experience, leading many players to experiment and create custom files that autorun their preferred settings. As many complex binds and commands wouldn't work until you type them directly in the console each time you launch the game, a config file is an easy and consistent solution to this problem. In this article, we will tell you how to create a cfg file for CS2 and use it to play as simply as possible.
What is Autoexec.cfg in Counter-Strike?
The Autoexec.cfg file is used by the game to launch regular settings and custom configs accessible through CS2 console commands. It can be run manually in the game or automatically when the game starts. The autoexec.cfg can be changed according to the player’s preferences, with an option to use pre-downloaded CS2 pro configs to play like the best of the best.
If you create a custom CS2 config and install it, you can reduce ping and increase fps, change crosshair settings (size, shape, and color), mouse sensitivity, and set the optimal brightness and screen resolution. Autoexec is also the only tool that allows you to bind to keyboard shortcuts and alter map settings, making it essential if you aspire to become a competitive player.
However, creating a cfg file from scratch is quite a troublesome process, and some users might not know how to make a cfg file for CS2 to work properly. Therefore, some novice gamers copy setting configs used by pro players. Most configurations are in the public domain, so you can easily download the best cfg for CS2 for free. However, even after acquiring the file, beginners frequently struggle to run it correctly. Let's discuss the best CS2 Autoexec and how to launch it to avoid any potential confusion.
Where to Find the Counter-Strike Config File?
The first thing we must discuss is the CS2 Autoexec location, so let’s first find the file with all your settings. When starting CS2 for the first time, a default config is automatically created. However, instead of the game folder as it was in CS:GO, it is located in one of the Steam client root folders — UserData.
Finding the right file may become a challenge if you use a Steam client to log in from multiple accounts. However, one feature makes it very easy to deal with configs on different accounts. This is how you can do it:
- Log into your Steam account, go to Inventory in your profile, and then click on the Trade Offers menu.
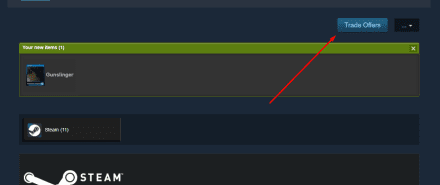
- Select the “Who can send me Trade Offers?” item in the menu to the right. You will see the link to the trade URL in the lowest block of the screen menu.

- What we need is not the link itself, but the number it includes. You don’t need to remember the whole number, just the last three or four digits.
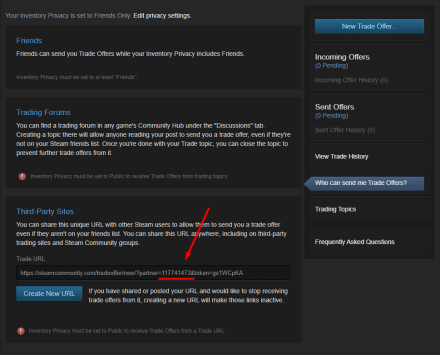
- Now we open the UserData folder in the Steam folder (NOT the folder with your Steam games), and bingo — we see the subfolder with the number in the link, which actually contains the config files linked to the account.
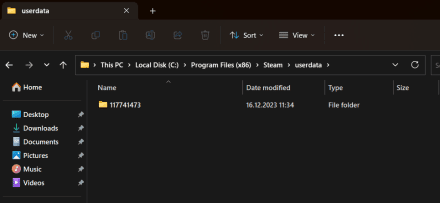
Having opened the subfolder, we see various files associated with your Steam games profiles. We need the CS2 configs located in the 730 folder. The following sequence is simple: open the Local folder, then the CFG subfolder, and you’ll see the default config files:
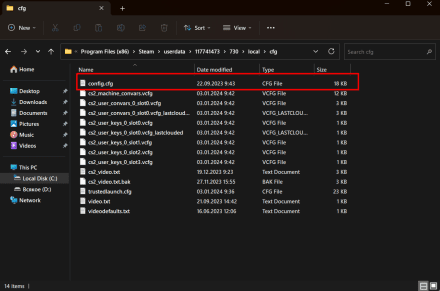
If you have just installed the game, you need to launch CS2 at least once to get config files generated automatically.
What to Do If You Can’t Find a Cfg File On Your PC?
The most common reason why you can't find an exec cfg file is that it is hidden. Let's see how to display it:
Setting Windows parameters
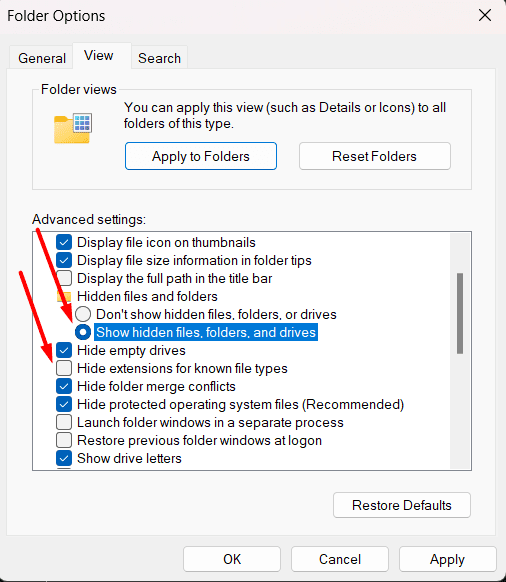
The first thing you need to do is disable Explorer's automatic file hiding. To do this, open any folder, click on the three dots at the top, and choose Options.
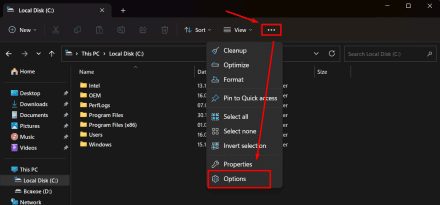
Proceed to the “View” tab, find the “Hidden files and folders”, and choose “Show hidden files, folders, and drives”. Additionally, you can uncheck “Hide extensions for known file types” to easily modify file formats.
By the way, CS2 HUD commands help you to customise the visual display of the interface in addition to setting up your Autoexec.
How to Open a Cfg File
Let’s continue our guide on how to set up Autoexec for CS2. To open a config file, you can use any text editor. We recommend downloading a convenient text editor, such as the Notepad++ program. It is fast and free and is more useful because it performs more consistently compared to the standard WordPad Editor.
How to Create A CS2 Config
If you don’t want to mess up with the config file, you can create a CS2 Autoexec file manually from scratch:
- Create a txt document in the CS2 config folder (usually it’s ...> SteamLibrary > steamapps > common > Counter-Strike Global Offensive > game > csgo > cfg).
- Open the text document, click on File, and choose "Save As".
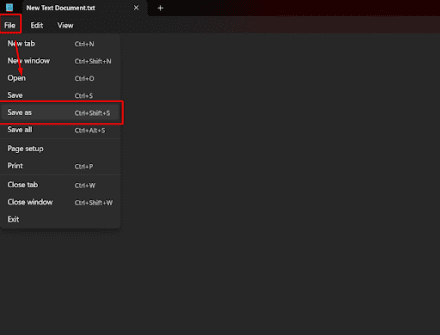
- Now, it is essential to give the file a proper name. First, choose the file type "All Files" and then give it any name. It is important that the name ends with ".cfg." (We recommend using Autoexec.cfg).
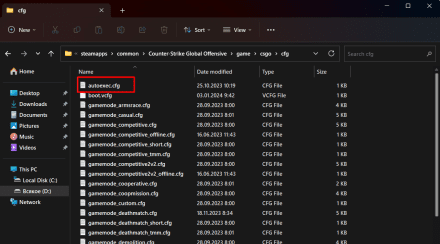
- Find a folder with configs on the Steam installation path and copy the information from the main config into your text file. Be sure to create backup files before changing anything.
- In order for the config to load into the game, you need to set it in the startup parameters of CS2. To do this, code the command "host_writeconfig X" in the developer's console, where X is the name of the config (e.g., host_writeconfig Autoexec.cfg).
To add key bindings to the config, you just need to add them to a text document. For example, to throw a flashbang, enter:
bind "key name" "slot7"
Later in the article, we will show an example config so you can understand how it's supposed to look.
How to Sync Updated Config With CS2
Now, let’s find out how to use an Autoexec in CS2. Writing a host_writeconfig X command might be convenient to check if your build is working, but doing it every time you enter CS2 might be tiresome. We need to make our Autoexec cfg CS2 load automatically at the game launch. To do this, we go back to our Steam client menu, go to the Library, right-click on Counter-Strike 2 in the library list, and click on Properties.
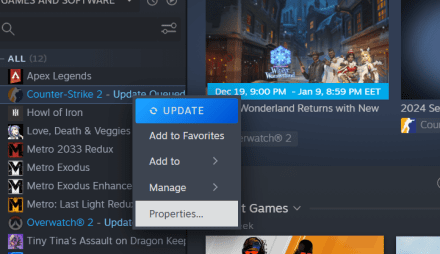
After that, click the Set Launch Options display button in the General tab. Enter the following command in the Set Launch Options menu:
+exec Autoexec.cfg
This will autoload our recently created config file. Furthermore, there are a couple of useful changes you can make in this menu by adding popular and best launch options for CS2.
-novid for skipping the intro,
-freq followed by the value of the maximum refresh rate of your display, which can be 60, 75, 120, or 144Hz.
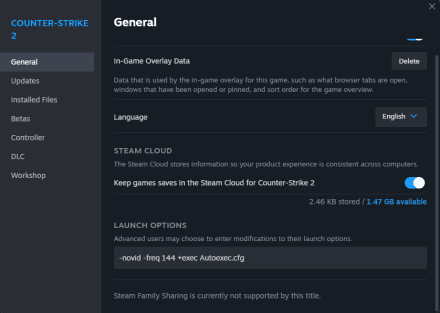
If this seems too complicated for you, or you don't want to spend a lot of time, you can always turn to the ready-made best autoexes config for CS2.
Example of Our Configuration File
Now that you know how to make a config in CS2, you may rename it with any acceptable name you like (except it still must have .cfg in the end), open the file for editing, and then copy or type in the binds or settings you need. For example, you may want to set up one of the best Autoexec for CS2 among listed below:
Cap fps
fps_max 999
Read more about this CS2 FPS command and many others in our separate material.
Grenade binds
bind "f" "slot7"
bind "q" "slot8"
bind "mouse4" "slot10"
bind "mouse5" "slot6"
Learn more about these and other commands in our article on how to bind nades in CS2.
Bomb drop bind
alias "+bomb" "slot3; slot5"
alias "-bomb" "drop; lastinv"
bind N +bomb
The crosshair
cl_crosshairalpha "255"
cl_crosshaircolor "5"
cl_crosshaircolor_b "0"
cl_crosshaircolor_r "255"
cl_crosshaircolor_g "225"
cl_crosshairdot "0"
cl_crosshairgap "-2"
cl_crosshairsize "2"
cl_crosshairstyle "4"
cl_crosshairusealpha "1"
cl_crosshairthickness "0.5"
cl_fixedcrosshairgap "-2"
cl_crosshair_outlinethickness "0"
cl_crosshair_drawoutline "1"
host_writeconfig
More CS2 crosshair codes can be found in a separate article.
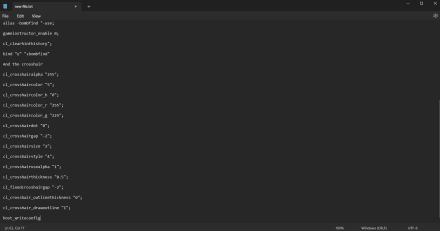
That’s it! Now you know every aspect of how to create an Autoexec for CS2. You can insert any settings you need in this config and change it as your playstyle evolves. A CS2 Autoexec can be very handy if you want to customize your game controls for quick and efficient gaming. If you are still unsure about how to customize an Autoexec file, you can always view the best CS2 binds.


