Best Autoexec Configuration Pack for CS2 (Download)

CS2 came out relatively recently, but that doesn't mean that old tricks don't work in the new game. In particular, one of the most useful features of CS2, which it inherited from its predecessor, is configuration files with pre-defined settings. These files contain all the game settings, bindings, and other parameters. Once you add such a file in the right folder and correctly set the parameters of the autorun, you no longer have to manually turn on and off the settings every time you launch the game.
Moreover, you can just download the config files of pro players. As you might have known, pro players manage to squeeze the maximum with minimal PC load and use the best bindings in the game. So let's take a look at the 10 sets of commands and binds from the best CS2 configuration file to bring your convenience to a whole new level and set you on an equal footing with players like s1mple, ropz, and NiKo. By assembling these binds into one file you can create truly the best config in CS2 ever, or just read on to download it as we’ve already done this for you.
Buy script
This script can rightfully be considered one of the best CS2 config, as it allows you to buy as fast as possible and spend the rest of the buying time discussing a tactic for the round. Of course, the best config file for CS2 is the one that is designed by you, so you may want to change some keys. Nevertheless, in this file, you will find the basic key binds and convenient config pack for CS2 that most players find useful.
bind "F1" "buy vesthelm; buy vest"
bind "F2" "buy ak47"
bind "y" "buy incgrenade; buy molotov; slot10;"
bind "x" "buy hegrenade; slot6;"
bind "y" "buy flashbang; slot7;"
bind "c" "buy smokegrenade; slot8;"
Jumpthrow grenade
Jumpthrowing smoke grenades is not just an action but a real art that is not easy to learn and even harder to perfect. These bindings will help you to automatically throw a grenade when you come to a certain point and jump so that you don't miss timings, which makes this file one of the best CS2 config for a competitive mode.
alias "+jumpthrow" "+jump;-attack"
alias "-jumpthrow" "-jump"
bind "h" "+jumpthrow"
Third-person view camera settings
Did you know that you may play CS2 in the third-person view as well? Although this mode will be extremely unfamiliar, some players choose it out of personal preference and just for fun. The only thing is that in order not to make your eyes bleed, you need the right camera settings. By adding these commands to your Autoexec, you will be more comfortable navigating in a third-person view.

c_maxdistance "200"
c_maxpitch "90"
c_maxyaw "135"
c_mindistance "30"
c_minpitch "0"
c_minyaw "-135"
c_orthoheight "100"
c_orthowidth "100"
c_thirdpersonshoulder "false"
c_thirdpersonshoulderaimdist "120.0"
c_thirdpersonshoulderdist "40.0"
c_thirdpersonshoulderheight "5.0"
c_thirdpersonshoulderoffset "20.0"
cl_chatfilter_version "1"
cachedvalue_count_partybrowser "1581038092"
cachedvalue_count_teammates "1581074689"
cam_collision "1"
cam_idealdelta "4.0"
cam_idealdist "150"
cam_ideallag "4.0"
cam_idealpitch "0"
cam_idealyaw "0"
cam_snapto "0"
Crosshairs
What's more important in a competitive shooter than shooting? Only hitting an enemy with a knife to show off your skill. So the crosshair is one of the essential settings to change, and this file is one of the best Autoexec script packs for CS2 for changing your crosshair.

cl_crosshair_drawoutline "0"
cl_crosshair_dynamic_maxdist_splitratio "0.35"
cl_crosshair_dynamic_splitalpha_innermod "1"
cl_crosshair_dynamic_splitalpha_outermod "0.5"
cl_crosshair_dynamic_splitdist "7"
cl_crosshair_friendly_warning "1"
cl_crosshair_outlinethickness "1"
cl_crosshair_sniper_show_normal_inaccuracy "0"
cl_crosshair_sniper_width "1"
cl_crosshair_t "0"
cl_crosshairalpha "255"
cl_crosshaircolor "4"
cl_crosshaircolor_b "144"
cl_crosshaircolor_g "238"
cl_crosshaircolor_r "0"
cl_crosshairdot "0"
cl_crosshairgap "-3"
cl_crosshairgap_useweaponvalue "0"
cl_crosshairsize "2"
cl_crosshairstyle "4"
cl_crosshairthickness "0"
cl_crosshairusealpha "1"
cl_viewmodel_shift_left_amt "0.500000"
viewmodel_presetpos "3"
However, you should remember that crosshairs are highly individual. What works for one player might not work for another. Therefore, if you want to set it yourself, check our comprehensive guide on how to do it correctly.
Mouse settings
Some of the best config settings for CS2 are the commands that are responsible for the mouse config. To hit the enemy, you need to aim accurately, which can only be done if the acceleration of mouse movements, speed, sensitivity, and other nuances are configured correctly.
m_customaccel "0"
m_customaccel_exponent "1.05"
m_customaccel_max "0"
m_customaccel_scale "0.04"
m_forward "1"
m_mouseaccel1 "0"
m_mouseaccel2 "0"
m_mousespeed "1"
m_pitch "0.022"
m_rawinput "1"
m_side "0.8"
m_yaw "0.022"
FPS counter panel
Lags in CS2 can be critical for a good player. That's why gamers often display the FPS meter on the screen to always see if some background process is affecting the performance of the computer. The following command allows you to display the FPS counter so that it is always in front of your eyes.

cl_showfps "1"
Network settings
Other useful CS2 config that can make your game better and the interface more informative are tied to the netgraph settings. Although the old netgraph command that gave you the exact information about network status, ping, and other important factors is gone, players can still see some of that data. If you are experiencing lags and sluggishness, you should pay attention to the indicators of this parameter. We provide you with the best Autoexec script pack for CS2 to display this tool.
cq_netgraph "1"
Quick bomb search
This command will help you quickly find a bomb when playing for the CT side. Pressing the C key will activate a notification in the game that will clearly indicate the location of the bomb, regardless of whether there are physical objects like crates and other obstacles between you. This command is especially useful when the enemy has planted a bomb and thrown a smoke grenade in its place to confuse you.
alias +bombfind "+use;gameinstructor_enable 1;cl_clearhinthistory"
alias -bombfind "-use;gameinstructor_enable 0;cl_clearhinthistory"
bind "c" "+bombfind"
Additional Useful Binds
If you don't want to spend time thinking up every key bind, you can just grab a ready-made one and use it. These binds are taken from s1mple's own config, as the best player should have the best CS2 Autoexec configuration. Here, you can find such useful commands as an automatic jump to the mouse wheel, which helps a lot with bunnyhopping. Quick access to chats is also an important part of this convenient CS2 config, as you can immediately give valuable info to your teammates.
bind "i" "noclip"— allows you to fly through any objects. Useful for map study and grenade training;bind "q" "lastinv"— equip the previously used weapon\item;bind "t" "+spray_menu"— open the graffiti spray menu;bind "u" "messagemode2"— open team chat;bind "y" "messagemode"— open common chat;bind "DEL" "mute"— mute your micro;bind "F5" "jpeg"— take a screenshot. Can be useful for reporting;bind "MOUSE3" "player_ping"— check your ping;bind "MWHEELDOWN" "+jump"— binding jump to the Mouse Wheel makes it easier to bunnyhop.
How to Install the Downloaded Configuration File on Your Steam Account
Well, those were the best Autoexec settings for CS2. We've compiled them all together in one file, so you won't have to visit dozens of websites or add commands you know nothing about.
Autoexec.cfg
But the catch is that it is not enough to download the best config in CS2, you must also install it. Fortunately for you, doing this isn’t difficult at all.
Important note: If you already had an Autoexec file when you played CS:GO, and it doesn't work in CS2, that's because the config folder changed its location.
- Go to Steam.
- Right-click on the game icon in the library and select Browse local files.
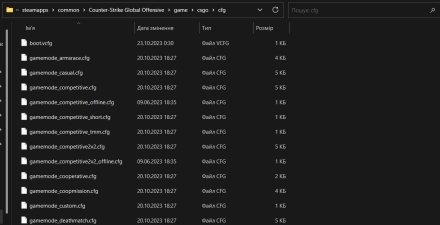
- You will see the folder where the CS2 files are stored. Next, open the \common\Counter-Strike Global Offensive\game\csgo\cfg folder.
Simply copy the config file to this folder.
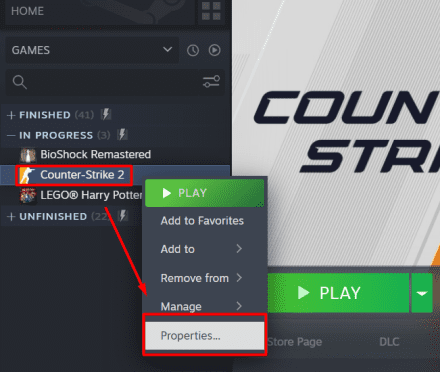
Open your Steam account, find Counter-Strike 2 in the Library, right-click on it, and choose Properties.
In the General tab, find the Launch Options, and add a
+exec Autoexec.cfgcommand. It is essential to not misspell the name of the file.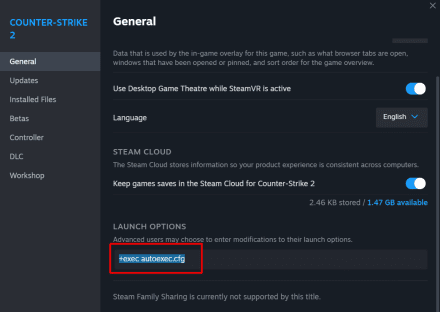


One more important thing to mention is that you can create several of the best CS2 config packs (for example, one for the mouse settings and other for buy-binds). The game will launch any number of config files as long as the settings do not contradict each other, files have unique names (e.g., Autoexec 1.cfg, Autoexec 2.cfg, etc.), and you add each of them to the launch options. Still, players prefer to add everything in one file, so it will be easier to modify when the need arises.


