CS2 Mirage Smokes
Contents

In competitive FPS games like CS2, knowing the terrain and the correct ways to utilize it gives a player an unparalleled advantage. In this article, you'll find a list of Mirage smokes that you can use to obstruct the enemy team’s vision, control their movement, and help (or stop) a site push with but a single well-placed grenade.
But before we start discussing the smokes for Mirage, make sure you’re familiar with Mirage map names. Without this knowledge, you will be hard-pressed to utilize the smokes, as most of them require you to quickly inform your team once deployed. If you already know what the map looks like, here’s a quick reminder anyway:
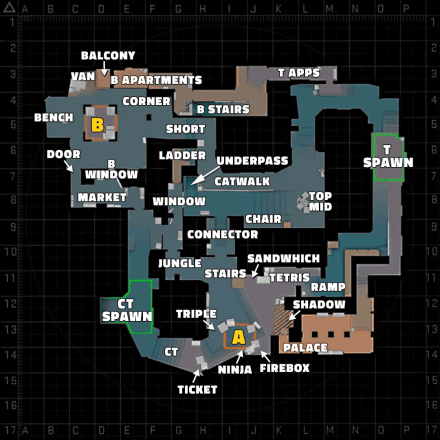
Knowing these callouts will also help you learn CS2 Mirage wallbang spots faster. But now, without further ado, let’s discuss each CS2 mirage smoke in more detail.
Mirage A Smokes
A Site to A Ramp
This is a simple Mirage CT smoke used for blocking the Ramp pushes. It can be thrown from a safe place and has a relatively easy lineup. The smoke on the A Ramp will completely block the enemy team's vision, forcing them to either drop the push or wait for the smoke to clear.
A Site to Connector
While this is primarily a CS2 Mirage CT smoke, Ts can also utilize it in post-plant situations. Although most Connector smokes can be thrown on the go and do not require any lineups, sometimes you might want to block vision from the Short without revealing yourself.
A Site to Palace
A Site on Mirage is a difficult place to defend, as Terrorists can potentially push it from several positions. If you have info that opponents are in the Palace and Ramp, you can utilize this grenade without risking being killed.
Tetris to Ticket Box & CT
While you can push the Ramp with flashes or simply sneak in and gather info, safely blocking CT vision near the Ticket is a must-have option for Terrorists. This CS2 Mirage smoke has a simple lineup, and allows you and your teammates to feel safer while on A Site.
Mirage B Smokes
Outside Market to B Apartments
This is a safe way to place a Mirage B smoke, which is useful if you find yourself near the Market during an enemy push. First, check if your opponents are still on the offensive: jump and move sideways while in flight. This way, it will be harder for the terrorists to hit you while you peek. If you see any Ts, drop the smoke as shown in the video. It will fall in the middle of the Apartments and delay the enemy team as they will be forced to proceed with caution.
B Site to Palace
There are two common scenarios when you may want to use this smoke. First, you can help your teammates on A Site if they have already used their own smokes and there’s no time for a proper rotation. Secondly, you can place this smoke in a clutch to confuse Terrorists, who’ll believe that the only defender is close to A Site, allowing you to catch them off guard.
B Site to A Ramp
This smoke is mainly used in the same in-game scenarios as the previous one. Interestingly, this lineup remains the same as it was in CS:GO, still requiring a precise crouch + shift + jump throw.
Mirage Mid Smokes
Top Mid to Jungle
You can use Mirage Jungle smoke to help your allies take A Site. When you are at the entrance to the Top Mid, Counter-Terrorists may assume you want to advance to B Site and pull back to the Top Mid in response. Smoking the Jungle in combination with a Stairs smoke will give away your intentions, but by the time the CTs return to A Site, your allies will already be there to give them a warm welcome.
Top Mid to Catwalk
Controlling Middle allows your team to perform a wide range of offensive moves, and blocking the Short is the obvious step if you decide to push A Site. This lineup is easy to remember, can be thrown safely, and makes it easier for your comrades to take the Window or Connector.
Top Mid to Window
The Mirage T side Window smoke is a pain to get right even for professional players, while most of us mere mortals will likely struggle with it even from up close. Still, after the first bullets left their traces on the walls and your team decided to proceed with the attack, re-smoking the Window can give you an unparalleled advantage. On the bright side, this lineup is safe and can be useful even if you're left solo on the Top Mid to confuse your opponents.
Mirage CT-side Smokes
CT Spawn to B Apartments
This is one of the CS2 Mirage smokes used by CTs to stop enemy pushes into B Site or imitate the B Site presence. At the CT Spawn, stand at the corner of the right wall. Use the two nearby buildings to find the correct spot (as shown in the video), and make a walking jumpthrow. The smoke will completely block the vision from the Apartments, forcing the Ts to either retreat or go in blind.
CT Spawn to A Palace
Another smoke for halting an enemy attack, this time from A Site. For maximum effect, we recommend combining it with other smokes we'll discuss next. To perform the maneuver, stand at the corner of the left wall on the CT Spawn, aim for the first wooden beam in front of you, and use jumpthrow.
CT Spawn to Top Mid
This Mirage Mid smoke is mostly used by the Terrorists for safer Middle execution, but CTs can also use it for distraction. It hampers the T side's ability to pick or spot rotations, forcing them to either delay their Mid-take or reroute through more predictable paths that your CT colleagues can pre-aim. Additionally, it allows your buddy at the Window to reposition, support your teammates, or focus on other threats without immediate risk from the Mid, enhancing the team's overall map control.
Mirage T-side Smokes
T-Spawn to Window
Gaining control of Mid on Mirage is crucial for the Ts, as it allows them to attack either B or A Site. Blocking the Window is key here because it's typically guarded by an opponent with an AWP. This smoke is best used in the opening seconds of the match. While Pros use lineups locked with spawn spots for an instant throw, you can instead use the Trash in the corner and unstable lineups. This is a much simpler way to do it, although it still requires crouch + shift a few steps + jumpthrow. Just try throwing it a few times in a row, and you’ll see how much more stable it is!
T-Spawn to Connector
This smoke is used to secure the Mid and is particularly useful during a Mid-to-B rush. This tactic obstructs the vision of enemies stationed near the Connector or Triple Boxes, preventing them from guarding the angle effectively. To execute this smoke, position yourself at the corner near the stairs leading to the TV Room. Aim at the white line at the top of the rug and perform a jump throw. This way, the smoke will land deeper in the Connector, which is exactly where you want it.
T-Spawn to Top-mid
The Crossing or Top-mid smoke enables your team to reposition towards the Boxes without being targeted by an opponent stationed at the Window (who, as we’ve already mentioned, is likely boasting an AWP). This smoke is particularly useful if your team aims to establish control in the Mid but is yet to decide on the follow-up strategy.
T Spawn to Stairs
It’s one of the easiest and fastest CS2 Mirage Stairs smoke lineups. Blocking only the Stairs is not recommended, as it does not fully obstruct the enemies’ vision. We recommend pairing it with the Jungle Smoke we’re going to discuss next. This combination will disorient the opponent on the A Site, making it easier for your buddies to capture it.
T Spawn to Jungle & Connector
If you’re serious about performing a Stair lineup on Mirage, you should know how to block the vision from the Jungle and Connector. This one is thrown from the safe position and lands pretty stably, even if you miss a few pixels.
T Spawn to Ticket Box & CT
Combining this grenade with the previous two Mirage smoke lineups will create an almost perfect wall of smoke near the A bombsite. If your team has a single smoke and decides to execute A Site, blocking the Ticket and CT usually makes the most sense, even if it leaves the Jungle or Stairs uncovered.
Other Useful CS Mirage Smokes
Back Alley to Market Door
While many Mirage T smokes are designed to help your team capture B Site, the Back Alley one is among the better options you can go for. A smoke on the Market Door can support your team during an advance toward B Site or can be paired with several flashes to support a rush. To perform this maneuver, position yourself at the right corner of the wall immediately past the TV Room and aim for the top of the second window to your right, just where the two walls converge. With your crosshair set, execute a jumpthrow for the smoke to land precisely outside the Market window.
Back Alley to Market Window
Another default smoke for Mirage B Site is the one blocking the Window, giving Counter-Terrorists a bit more breathing room. This smoke is pretty easy to do, and is widely used at all levels of play. Still, we recommend diving into the practice map and training the throw so the grenade will jump right into the Window rather than merely land near it.
Back Alley to Catwalk
Oftentimes, your team will know that one of the CTs is playing on the Catwalk, supporting both B site and Middle. If this is the case, you can throw a blocking smoke to the Catwalk, allowing your team to focus on the B Anchor.
Once you learn these grenades, you can move on to CS2 Inferno smokes and other competitive cards.
