All Mirage Callouts in CS2
Contents
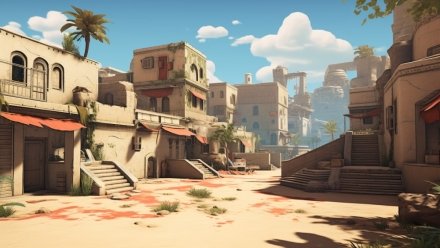
Mirage is currently the most popular map in CS2, featured in nearly 23.9% of all matches. With such widespread popularity, many players are eager to learn Mirage location names to enhance their teamwork and enjoy the game even more.
Originating from CS 1.6, Mirage has undergone several changes and remains a staple in official professional tournaments, as well as in Competitive and Premier modes. The map offers plenty of open spaces where players can hone their aiming skills. Its open skyboxes provide opportunities for creative bombsite strategies, with dozens of regular and fake smokes making the action even more attractive.
However, even those who play the map daily can mix up some Mirage spot names, so brushing up or learning these key spots can be a game-changer. And that’s to say nothing about newcomers aiming to improve communication with teammates, learning the important Mirage positions is crucial to climbing ranks quickly.
CS2 MIRAGE MAP NAMES
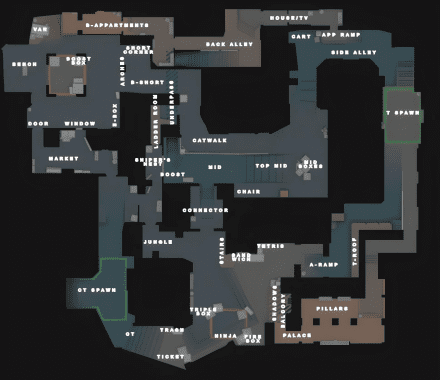
The Mirage callouts can be broadly divided into five key zones:
- A Site;
- B Site;
- Middle;
- T-Spawn;
- CT-Spawn.
The last two zones are the starting points for each round and are less involved in active skirmishes. However, the first three zones demand special attention, requiring a detailed understanding of the main paths and specific spots to understand the battlefield.
MIRAGE A SITE CALLOUTS
A Site is located pretty close to both Terrorist and Counter-Terrorist spawns, with has three major paths for both sides to fight for it. This makes A Site a central focus in the game plan, and knowing the Mirage map names for this area is essential. When planting or defusing the bomb, it's crucial to be aware of your position to avoid getting caught in one of the CS2 mirage wallbang spots and getting taken out through cover.
Tetris
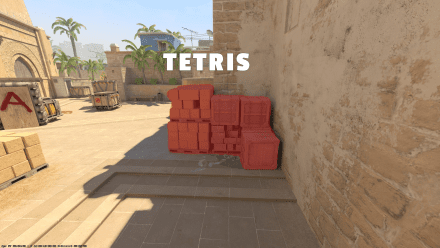
This is one of the most important Mirage positions in CS2. It got its name because of many smaller boxes and bricks that visually resemble the classic Tetris game. This position is vital for clutches.
Sandwich
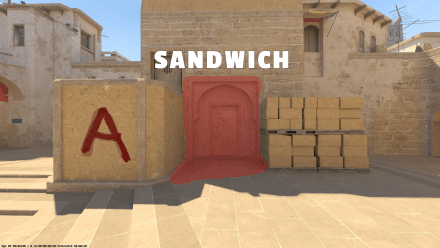
Nestled between the Tetris and Stairs, this spot can feel like a squeeze, with pressure coming from both sides.
Stairs
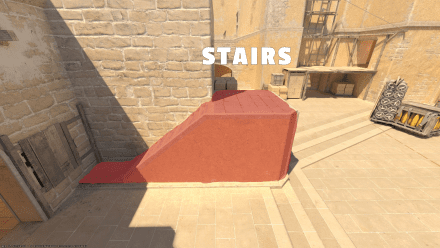
Without jumping, one can easily use the Stairs to hold for fighting enemies in the Palace, Ramp, or A Site. However, it leaves you exposed to multiple angles.
Jungle
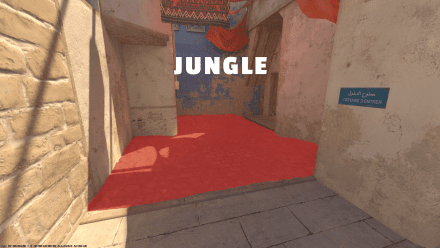
That is a narrow passage between the A Site, Window, and small halls to the Ladder Room and Market. This spot is actively used by AWPers and those quick rotators who want to arrive from the B Site to help.
CT
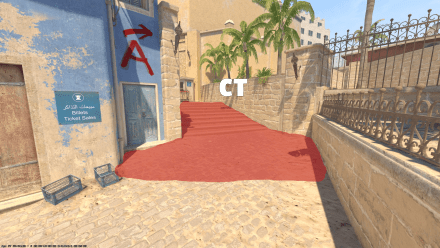
CT refers to the wide area near the CT Spawn, with hiding spots at Trash and Ticket. It's sometimes referred to as CT Ramp.
Triple Box
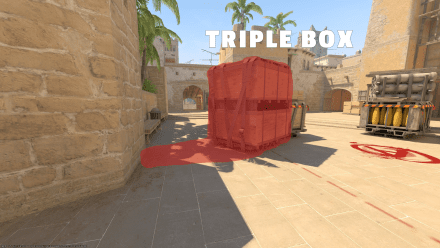
A stronghold for confident players, offering a line of sight on all potential Terrorist entry points to A Site, though you'll need to be agile if attackers swarm.
Trash
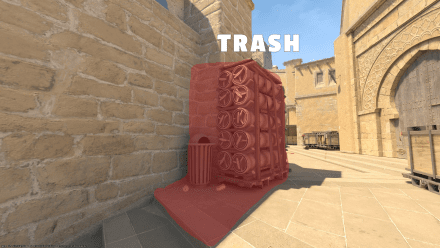
Trash is located behind the barrels used as a protective wall. It isn’t suitable for long engagements.
Ticket
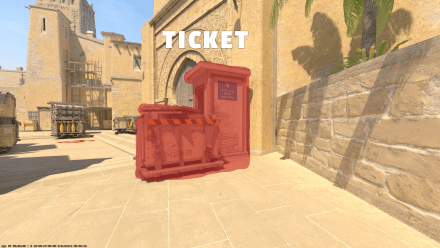
Once used for selling tickets, now a prime spot for holding A Site from the Ramp and Palace, with some players climbing on top for a better vantage point.
Ninja
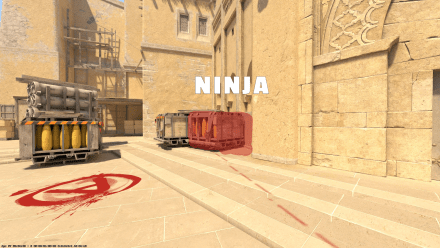
A sneaky area in front of the Fire Box, occasionally overlooked by Terrorists, allowing CTs to make a few unexpected kills or even make a Ninja defuse.
Fire Box
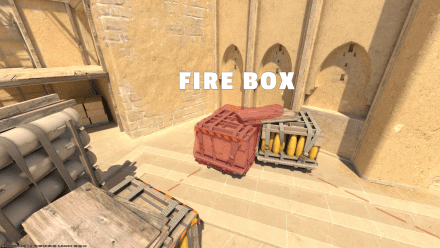
A camper’s paradise, though often flushed out with fire or grenades. Still, the Fire Box is a nice spot for clutches if left unchecked or used rarely.
Palace
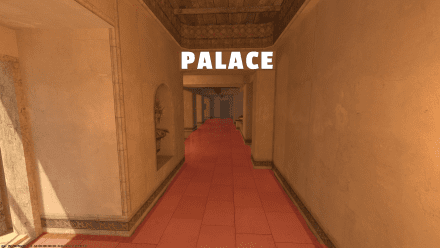
A huge area between the Balcony and T-Spawn. Palace is often used to assist in A Site takes and divert CT attention.
Pillars
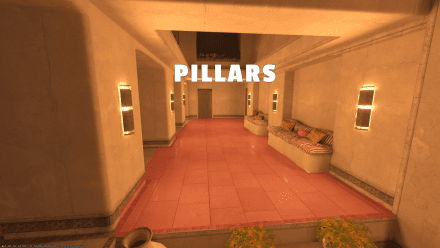
Located inside the Palace, you may notice a perfect area for the T-team to hide before entering the A Site. Considering the number of pillars there, it’s pretty easy to remember this callout.
Balcony
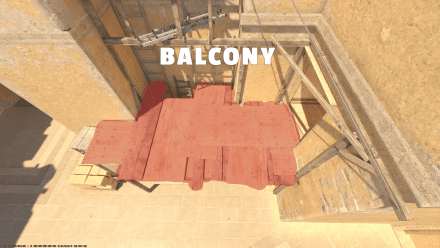
An open area extending from Palace, critical for executing an A Site push, though exposed to CT, Jungle, and Stairs.
Shadows
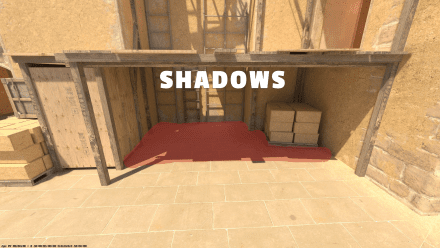
A dark area under Balcony, often used by shotgun players to ambush Terrorists from Ramp or Palace.
A Ramp
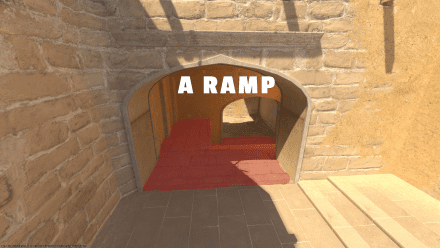
The quickest route from the T-Spawn to A Site, making it a popular path for fast A pushes or CT aggression.
T-Roof
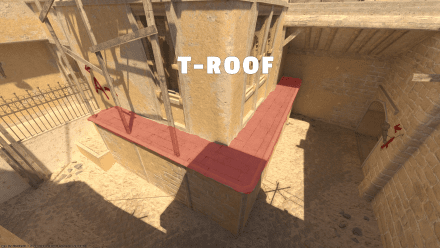
A raised ledge near the T-Spawn, often used by Terrorists to set up an ambush for Counter-Terrorists pushing through the A Ramp.
MIRAGE CALLOUTS ON THE MIDDLE
The Middle is a vast and crucial area, offering control over split executions to both bomb sites. The Middle is huge, and with its size and importance, knowing each CS2 Mirage callout in this zone is critical.
Side Alley
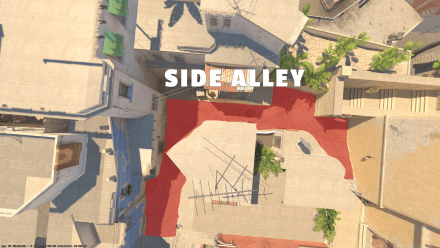
Some kind of a small elevation connecting Top Mid and T Spawn, used to hold off CT pushes in the Mid.
App Ramp
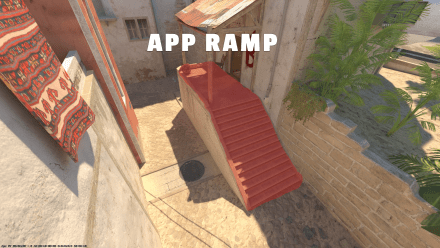
Typically used by the terrorists to access B Apartments without being spotted by a CT sniper in the Nest.
Cart
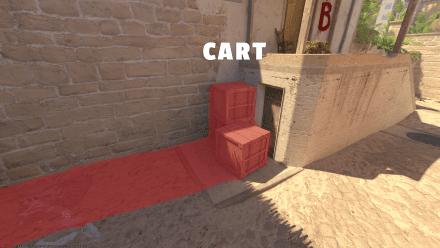
The boxes here serve as a boost to the App Ramp, named after the cart that once occupied this spot hence it’s got the Mirage map name.
House/TV
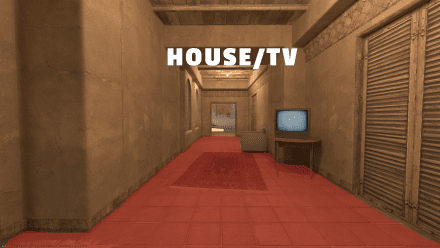
Exiting the App Ramp leads to a room where you can “watch” a TV. However, we all know that most players are more focused on fragging than viewing.
Back Alley
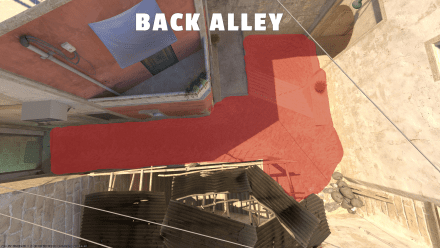
This point allows the T-team to perform maneuvers. For instance, they may enter the Mid via Underpass or continue to B Side through B Apartments.
Underpass
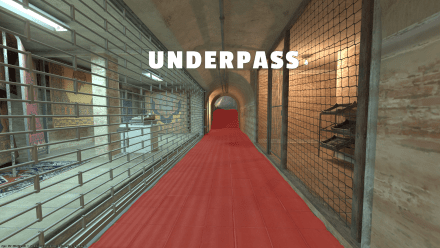
This tunnel leads you from Back Alley directly under the Nest in the Mid, which is useful for sneaking up on an enemy sniper.
Top Mid
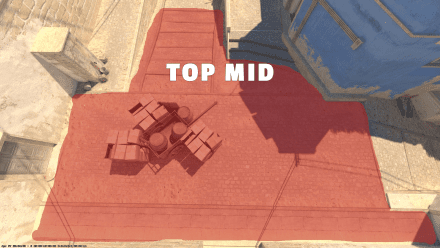
Here, the early battles occur for Terrorists, who face off against CTs in the Window, Connector, or even B Short, while Counter-Terrorists love to expect Ts early in the match.
Mid Boxes
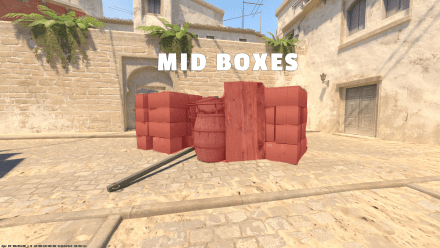
Provide cover for Terrorists pushing the Mid or trying to maintain control of the Middle area.
Catwalk
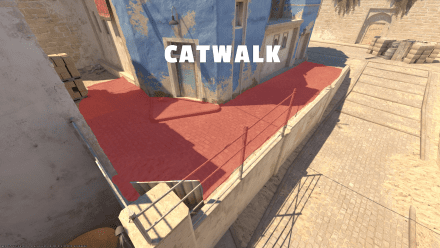
After securing Top Mid, Terrorists can advance to B Site via Catwalk, especially if Window and Connector are smoked off. Window smoke is one of the most important and popular CS2 mirage smokes, so it is very crucial to know how to use it.
Ladder Room
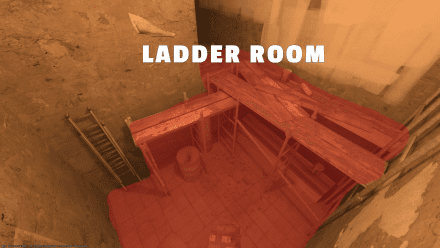
This tiny room with access to the Nest via a ladder through a hole in the wall offers a secondary path to Mid control.
Chair
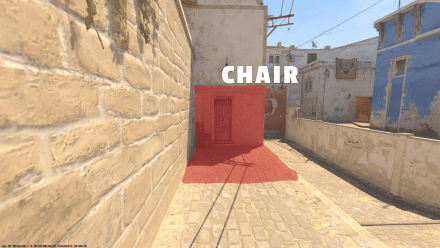
A small corner near the Connector with a chair in it, offering a safe spot to hold the B Short without exposure to the Connector or Window.
Connector
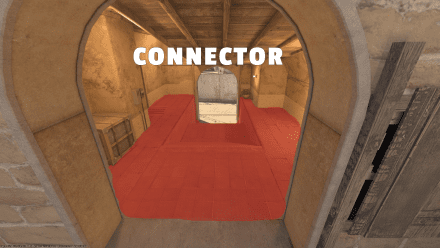
A multipurpose location on the map that helps control Top Mid, Catwalk, Underpass, and even Palace. The Connector is among the toughest CS2 Mirage callouts.
Boost
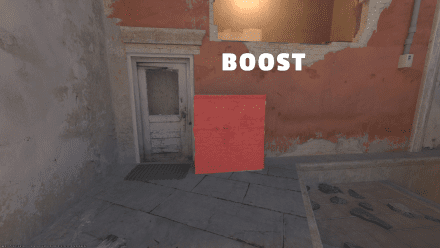
A position between the Connector and Sniper’s Nest, which is often used for boosting players right into the Window.
Sniper’s Nest
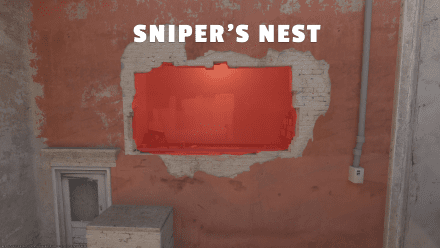
Sniper’s Nest, also known as Window, is a key position for CTs with scoped rifles, providing a strong vantage point until it gets smoked or challenged by Terrorists.
MIRAGE B SITE CALLOUTS
Controlling B Short is essential for a successful B Site execution; otherwise, Terrorists might find themselves in a tough spot attacking from Apartments alone. Of course, it can happen with some well-placed smokes and flashes from Back Alley and quick movement through House, even two well-coordinated CTs can stall a B push. Let's break down the major zones and review the Mirage names on the B Site.
B Apartments
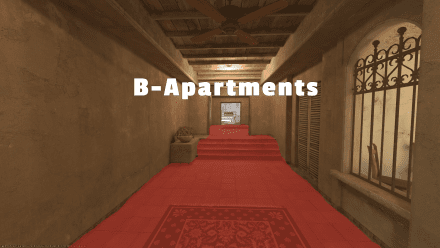
It’s hard to imagine a B Site execution without Ts coming from the B Apartments. A long, narrow corridor is easily controlled by CTs if left unchecked.
Van
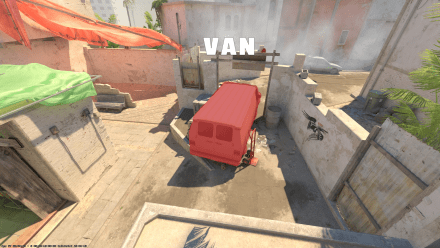
This is one of the spots to hold B Apartments, as CTs can play from diverse sides of the van and even on it. However, this pretty open location is often mollied and flashed.
Bench
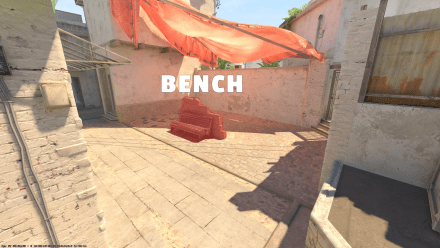
A thin brick wall with a Bench in front, ideal for Counter-Terrorists to hold a B Apartments push. Veteran players sometimes call it ‘Forest,’ after a legendary Swedish CS2 professional.
Boost Box
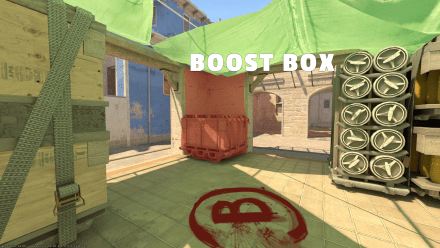
A protected corner with a box is a nice place for CTs to be boosted and unchecked, which can be especially useful on eco-rounds.
E-Box
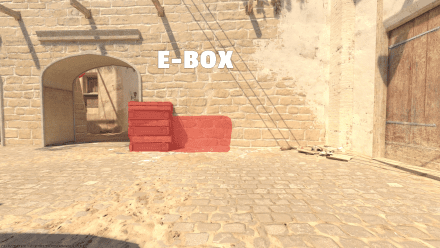
A zone on the B Site located between the planting zone and Market, with wooden pallets for cover. With supportive nades, one can hold off a B-rush pretty well from the Safe.
Market
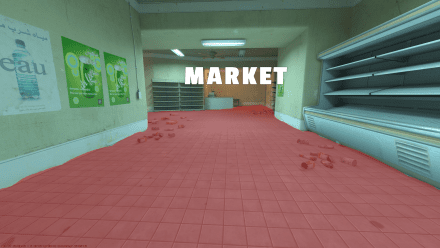
Controlling the Market l is key to retaking B Site. One can jump out of the B Window or push through the Doors, both of which are vital in clutches.
Door
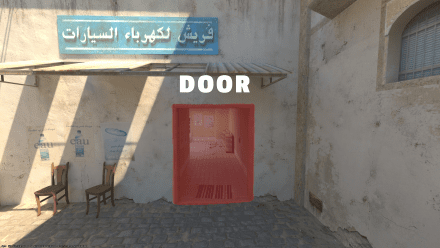
One of the ways to enter the B Site from Market, which is often used to control the Van and cut off rotations to Bench.
Window
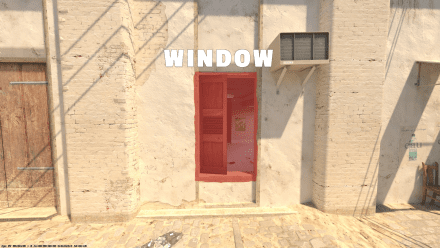
A popular spot to save a B Site holding it via the B Window, where a skilled AWPer can pick off opponents in Apartments. It also has tricky angles to cross-control the Market and Site.
B-Short
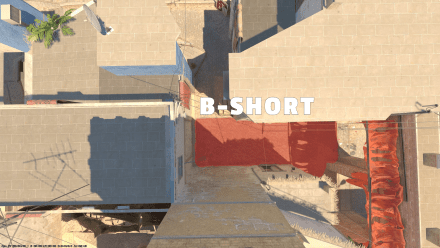
A player holding B Short can assist with Middle and reinforce B Apartments if needed, making this area one of the most crucial Mirage map callouts.
Arches
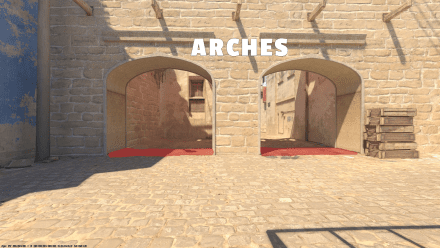
A pillar between two arches is crucial, providing cover for a B Short player as they can hide there. Its old-school name ‘Edward’ came from a famous Ukrainian rifler.
Short Corner
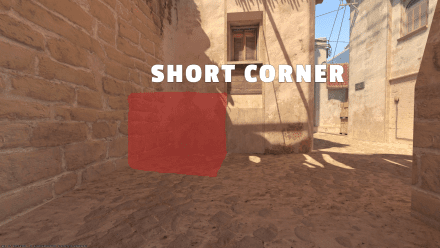
When Arches become too risky, Short Corner offers a safer spot to cover Apartments and B-Short simultaneously.
To improve your gaming skills, it is important to know the positions on other cards, namely:
CONCLUSION
These Mirage place names will help you better coordinate your actions on this map. Your teammates will appreciate your precise and timely communication, which you can enhance by mastering these Mirage callouts in CS2.
FAQ
The best hiding spots on Mirage are Shadows, Ninja, Chair, Short Corner, and Sneaky, but don’t be surprised if opponents check you there 😉
CT Side AWPers prefer holding Sniper’s Nest, Market, and Ticket, but often relocate after taking a shot. T AWPers start by picking opponents from the Top Mid, Kitchen, and Ramp (Pit) but adjust their position based on team calls.
For CTs, B Site is easier to hold, as opponents primarily attack from Apartments, with less frequent pushes from Short.
According to HLTV’s stats, Mirage shows a slight CT bias, with CTs winning 52.7% of rounds while Ts celebrating 47.3%.
