CS2 Nade Practice Commands
Contents
CS2 grenades are one of the most vital tactical tools in the game. You could be the best marksman on the server — but what good is that if you can't even approach your enemies because a passage is blocked by fire, smoke, or you’re blinded?
That’s why every aspiring pro in CS2 must master the art of throwing grenades. If you want to outplay your enemies with unexpected moves, you need to know the exact timing and lineups to deploy these game-changing utilities. Do you wonder where to begin your training? Check our guide to discover essential tips and console commands that will set you up for success.
Preparing for Nade Practice in CS2
You can’t properly train without using CS2 nade training commands. This skill is definitely important for understanding how to play better in CS2 and improving yourself as a player. First, you need to enable commands in-game and check a few key configurations.
How to Enable the Developer Console
There are many helpful commands that you can use to enhance your training. However, if you want to apply them, you need to take some easy steps to enable the Developer console:
Open the game and go to Settings (gear icon).
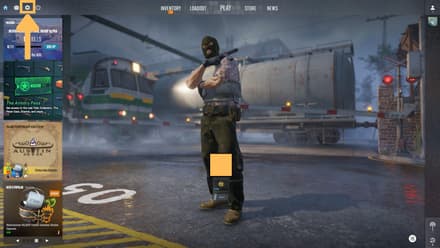
Navigate to the “Game” tab and look for the “Enable Developer Console” option. Make sure it’s set to “Yes.”
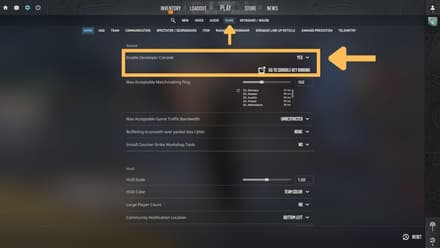
After that, you can activate the console by pressing [~]. You can even try it directly from the main menu to confirm you’ve done everything correctly and it's working properly.
![You can activate the console by pressing [~]](https://profilerr.net/static/content/thumbs/440x/7/c6/54ygfv-743a2faebd31079175ff1143f9d3bc67.jpg)
Settings for Nade Practice
It’s also important to check the essential nade practice config in CS2. Return to the “Game” tab in Settings and find the “Grenade Line-up Reticle.”
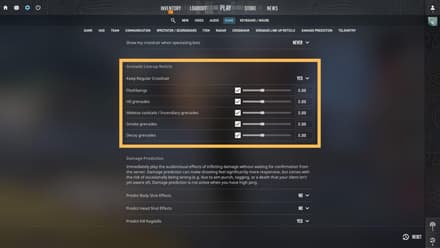
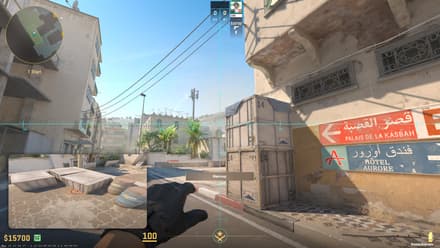
We strongly recommend enabling this option during your training, as it activates an extended crosshair for more precise lineups. Additionally, this helpful feature shows where a grenade will land, making aiming and discovering new spots for throwing nades significantly easier. However, consider that this feature is unavailable in competitive matches.
Creating a Practice Map
You can use CS2 grenade practice commands only on special maps. Here is a simple way to create your own training arena:
Open the “Play” menu and select the “Practice” tab.
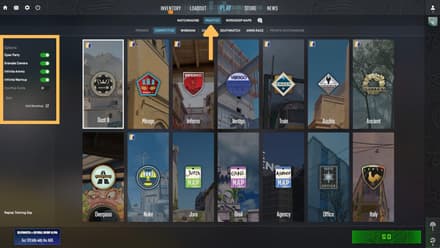
- Enable the “Grenade Camera,” “Infinite Ammo,” and “Infinite Warmup” features on the left side of the screen. They actually work similarly to some in-game commands described further, so if you’ve forgotten to activate them, you’ll always be able to do it via the console. Some maps also feature the “Map Guide,” which is helpful for learning key locations and nade lineups.
- Select your preferred map. It’s better to start training at the locations where you prefer to play competitive matches.
Essential CS2 Nade Practice Commands
You can use CS2 smoke practice commands to enhance your training environment and allow for full control over your practice sessions. While some of them mimic the “Practice” menu settings, the majority still provide added flexibility to create custom conditions for your comfort.
Server Setup Commands
First, let’s prepare our map for the training using CS2 nade practice commands. Start by typing sv_cheats 1 in the console, and follow up using the following commands:
Command | Description |
| Provides unlimited ammo, including grenades |
| Allows you to move through walls and objects |
| Skips freeze time at the round’s start |
| Kicks all the bots from the map |
| Sets the round timer to 60 minutes |
| Gives you $60,000 at the start of each round |
Utility Practice Commands
You probably understand how to get infinite grenades in CS2 practice, but do you know how to increase their number in your inventory? Using the following commands, you can do it, as well as activate other cool features for your training.
Command | Description |
| Displays the point of impact for thrown grenades |
| Extends the visibility of your grenade impacts for 10 seconds |
| Visualizes grenade landing points (this CS2 grenade camera command works similarly to the Grenade Line-up Reticle) |
| Increases your grenade inventory limit from 4 to 5 |
| Gives you a HE grenade |
| Gives you a flashbang |
| Gives you a smoke grenade |
| Gives you a Molotov/incendiary grenade |
Useful Binds for Efficient Practice
Setting up key binds allows you to quickly activate CS2 nades practice commands, so you don’t need to spend your time entering them again and again every time you enter the game making practice more efficient. You can do it in the special .cfg file or directly in the Developer console. Here are some useful binds that you can use for training (enter a certain keyboard button instead of the <key>).
Command | Description |
| Immediately allows you to move through obstacles. The best key for this bind is “N”. |
| Repeats your last-thrown grenade using the same trajectory—ideal for testing flashes and incendiaries. The best key for this CS2 rethrow grenade command is “K”. |
| Instantly makes a thrown incendiary disappear. Use it when you’ve thrown the nade incorrectly, so you don’t need to wait for the flame to fade. |
If you don't know how to bind nades in CS2, you can find the answer and more in our separate article.
Best Maps for Practicing Nades in CS2
As you already know, you can use any traditional map to practice nades in CS2. However, you can go even further and download dedicated Workshop maps to improve your technique.
Workshop Maps
You can find numerous maps in the Steam Workshop specifically built for boosting your in-game performance. It’s possible to use CSGO nade practice commands mentioned above while playing on them. At the same time, these maps don’t simply allow you to experiment with grenades. Often, they guide you through the map, explaining the best spots for throwing this or that nade, when to opt for them, and so on (similarly to the official “Map Guide” feature). Here is a list of the noteworthy maps to add to your CS2 library:
- Training Mirage Guide by ForceiD, as well as other guides from ForceiD.
- Dust2 Training by Dolnma, as well as other guides from Dolnma.
- Jump Throw Practice [JTP].
How to Install and Use Practice Maps
You can find a lot of exciting community maps in the Steam Workshop. Following our simple instructions, you’ll need seconds to install them and start training:
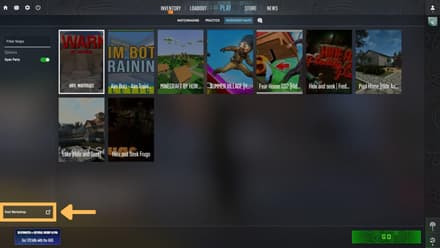
Open the game and find the “Workshop Maps” tab in the “Play” menu. Click the “Visit Workshop” button located on the bottom left side of the screen.
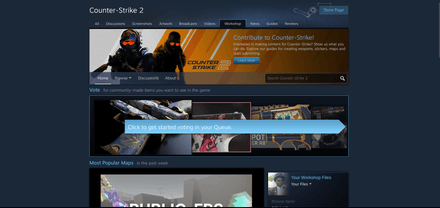
The game will open a separate window for the Steam Workshop, where you can use the Search feature or various filters to find the desired map. Once you do it, enter its page in the Workshop.
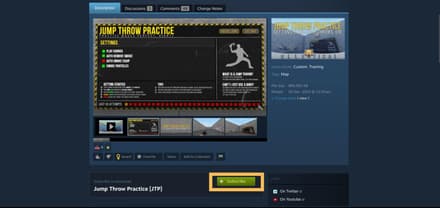
Click the “Subscribe” button on the map’s page to download it.
- After the download, return to CS2, enter the “Play” menu and select “Workshop Maps” once again. You’ll find the chosen custom map there.
Take into consideration that some maps may require custom adjustments (e.g., the usage of specific console commands or setup). As a rule, the author informs about them in the description, so don’t forget to read it before you start training.
How to Practice Nades in CS2?
In a live match, you don't have time to hesitate. That’s why repetition is key — to remember the order of operations, you need to drill these throws until they become second nature, so your muscle memory kicks in.
Thus, daily practice is vital. You can either create your own routine using the tips from the previous sections or follow an existing routine shared by others. A great approach is to watch some guides on YouTube, memorize the best throw spots, and then replicate what you’ve seen. This repetition will help you develop and solidify your skills much faster. Also, don’t forget to follow some of the useful tips provided below to level up the efficiency of your training.
Focus on Meta Smokes and Pop Flashes
Most of the crucial lineups have already been known and tested by pro players (they’re called “metas”). All you need to do is study them to gain a serious edge. Fortunately, there are numerous resources available to assist with that. Useful resources include the Profilerr site, which features tutorials for:
- CS2 Overpass Smokes;
- CS2 Vertigo Smokes;
- CS2 Inferno Smokes;
- CS2 Dust 2 Smokes;
- CS2 Mirage Smokes;
- CS2 Nuke Smokes;
- CS2 Ancient Smokes;
- CS2 Anubis Smokes.
Also, you can use various helpful third-party platforms. For example, you can master your throws by studying the maps on CSnades. This is a truly great tool for learning, as it includes numerous screenshots and schematics that you can explore directly in your browser.
Record Your Throws
Recording and reviewing your matches is another great tip for anyone who wonders how to practice nades in CS2. By watching your moves in competitive matches against real people, you can deeply review your performance, like finding out whether the usage of this or that utility brought value to your team’s overall performance. Remember, it’s not just about accurately deploying smokes or flashbangs — coordination with your actions with your teammates is equally crucial. Well-timed utility, when paired with team communication, can create powerful tactical advantages.
Additionally, reviewing in-game recordings allows you to switch between the first-person perspectives of all players. This helps you assess the actual impact of your grenades on the enemy. Pay close attention to whether your smokes truly blocked enemy vision and whether your flashbangs effectively disrupted their positioning. Evaluating these moments can provide valuable insights into the effectiveness of your utility.
Learn to Create Fakes
Many beginners focus solely on using grenades to efficiently cover their own positions or break through the areas protected by enemies. However, they often overlook one of the most strategic uses of utility: creating chaos and misdirection on the map, puzzling their opponents.
Every location in the game contains specific angles and spots where you can throw smokes or flashbangs to simulate the attack. Learning just a few of these fake lineups can confuse opponents, force unnecessary rotations, and open up new opportunities for your team. Mastering this skill can greatly increase your chances of winning crucial rounds.
Conclusion
By learning how to throw CS2 nades on a map, you may even discover your own unique lineups — ones your enemies won’t expect. Eventually, using your own secrets, you can surprise your enemies with unexpected tactical maneuvers and significantly enhance your team’s performance. The more you understand the in-game dynamics in Counter-Strike 2, the better you'll adapt — and the more impactful you'll be in every match.
