How to Inspect Skins in CS2?
Contents

CS2 skins are one of the game’s visiting cards. Just like hats from TF2, they allow the players to express their style and get bragging rights in the community. Furthermore, some rare patterns like the Blue Gem skins for AK-47 can be a decent way to invest your money as their price keeps growing monthly.
On the not-so-bright side of things, this system allows scammers to prey on inexperienced players by selling them overpriced skins. So, whether you’re a newcomer or a veteran, knowing how to inspect skins in game CS2 and on third-party platforms is the only foolproof way to avoid getting tricked. And avoiding scams is exactly what our guide is here to help you with!
What is Skin Inspection in CS2?
Before we dive deeper into the specifics of a CS2 skin test, you should get acquainted with the cornerstones. There are several features to consider during the evaluation process.
Skin wear and float value
CS2 float extension has a direct impact on the skin’s value, defining how worn it looks. This metric may range from 0.00 to 1.00. As a rule, the lower the float, the higher the value, but exceptions do exist. Also, despite the popular CS2 myth, this metric doesn’t change over time as you use a certain skin in the game (this was Valve’s original intent, but it was scrapped due to reasons better left for another article).
When you test skins in CS2, you may notice that this metric includes the following level:
- Factory New/FN (0.00–0.07);
- Minimal Wear/MW (0.07–0.15);
- Field-Tested/FT (0.15–0.37);
- Well-Worn/WW (0.37–0.44);
- Battle-Scarred/BS (0.44–1).
Usually, FN skins are the most expensive ones, but that’s not always true. For example, if you opt for the AK-47 “Green Laminate,” you may notice that its Well-Worn version has a slightly higher price than the Factory New one. Also, not all skins have all five levels of float.

Souvenir and StatTrak versions
There are also some skin versions that are way more expensive than their ordinary colleagues. They are not available for every weapon, but you can still find a lot of them on the market. There are currently two types of such “upgrades”:
- Souvenir. These skins are obtainable only at Majors, and available in special Souvenir packages dedicated to different maps. They come with golden stickers. However, after the introduction of purchasable golden stickers in 2021, this cool feature has lost its uniqueness as anyone can now craft a gun that looks like a souvenir skin.
- StatTrak. This version counts how many enemies you’ve killed with the skin equipped, allowing you to proudly boast about your results. Due to this awesome feature, sometimes the difference in price between StatTrak and ordinary skin may reach several thousand USD.
Skin patterns
Some skins like Kami, Case Hardened, or Crimson Web have a random texture applied to them when you get one from a case. The way they look is defined by their seeds (indexes), and all in all, there are 1,000 variations for each skin family we mentioned. Moreover, the seeds are also divided into Tiers based on how good they look (for example, the amount of blue visible on a Case Hardened skin), where the skins from Tier 1 are way more expensive than the ones from Tier 4.
Recognizing a pattern without prior experience can be incredibly difficult, and scammers happily use this to deceive new and gullible players. So, you should always check the item’s seed before purchasing it.
Stickers and their placement
Last but not least, the players can enhance their skins with up to five stickers. Moreover, once applied, these decorative elements can’t be reclaimed, and if you want to remove the sticker, you need to destroy it.
Currently, the game allows the players to place stickers whenever they want on a gun. Some digital craftsmen create truly unique combinations, which significantly boost the gun’s price. Sometimes, they even manage to recreate famous works of art, and, of course, such skins immediately attract thousands of players.

How To Inspect Skins In The Game CS2?
Considering that the most expensive CS2 skins can have prices comparable to real estate, you definitely want to inspect the one you’re buying before making the purchase. Luckily, you can check them directly in Counter-Strike. Next, we’ll describe all the possible ways to inspect CSGO skins in game.
In-game inventory
Once you’ve launched the game, open the Inventory tab. You can find it right next to the Loadout tab at the top of the screen.

You’ll see all the skins you have in your inventory. If you want to review one of them, simply right-click on the item and choose “Inspect.” It’ll take you into inspection mode, where you can have a better look at the 3D model of the chosen weapon. Here, you can rotate it or zoom in and out to check each detail.

Buy menu
From time to time, Valve releases updates, often accompanied by cases with amazing new skins, which you can get by opening cases. However, before testing your luck, you may want to review each of the guns and select your favorite weapons.

This process is similar to inspecting the skins you own: right-click the item you like and select the “Inspect” option. It’ll take you to the inspection mode, where you can fully examine the skin.

Third-person mode
Want to know how to inspect skins in CS2 in third-person mode so you can discover the way other players see you during the game? First of all, note that you can do it only with the items from your inventory. To do so, enter the “Loadout” and choose your CT or T character.

Here, you can experiment with your in-game look by trying different cosmetics for guns (click on the desired weapon, and it’ll appear in your character’s hands) and knives. By the way, if you wonder how to test gloves in CS2, you can do it in the Loadout, too!
In-game matches
This method of how to inspect CSGO skins in game needs no explanation: just play with a skin and see how it looks! Moreover, you can find an attractive-looking gun on the ground dropped by your teammate or an enemy (except for knives and gloves). You can use these weapons until you replace them with something else, or get eliminated during the match.

How to Use the CS2 Inspect Command?
Although there are many ways to visually inspect skins, there are occasions when it can’t do the trick. What if you want to see how AWP | Gungnir looks in the game without purchasing it? That’s where inspect commands come into play!

Turning on the command console
First of all, you need to turn on the command console in Settings. Open the “Game” tab and set “Yes” in the “Enable Developer Console” section. Now, you’ll be able to activate the console by pressing the “~” or “`” button.

Entering the inspection map
Now, you need to find a CS2 skin inspect server. There are many Counter-Strike communities and platforms that offer this feature, but if you don’t want to waste your time looking through all of them, you may opt for CS2 Inspects. Simply choose “View Server List” and enter the one you want by clicking the “Connect” button.

Alternatively, you can use the connect xxx.xxx.xx.xx:xxxxx command in the console, where “x” is the desired server address.
Inspecting the skin
Now you know how to test skins in CS2 without making a purchase! You just need to enter one out of two specific commands in the chat to get the gun you want. To do this:
Return to the website's homepage, and locate the Primary tab. Click on it.
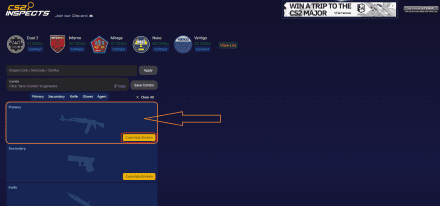
After clicking on the ‘Primary’ tab, you will see a big table with weapons on the right side of the screen. To simplify the process, use the search bar and enter the first letter of the skin you want to test.

By clicking the ‘Plus’ button under the weapon, you’ll get an opportunity to choose any five stickers. Let’s use Holo stickers of two GOATs, s1mple and ZywOo, dedicated to their performance in two CS:GO Majors, Paris 2023 and Rio 2022.
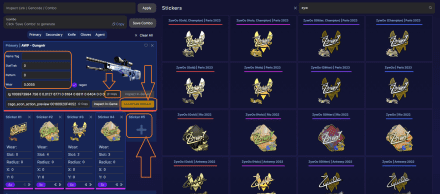
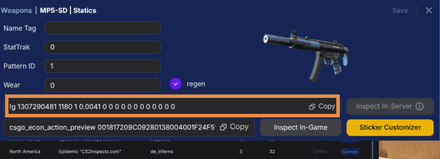
After placing stickers, simply close this extra window by licking its upper right corner. Then, click on the ‘Copy’ button to copy the code for the skin-sticker combination and enter it into the console.
You can also use the “!I x” command to inspect existing items from the community market or the most expensive CS2 inventories. Here, you have to replace “x” with a skin inspect link, which you can find by entering its page.


How to Inspect Skins in the Steam Market?
Entering the skin market on Steam is as easy as ABC, and you can do it directly from your browser. Here, you can use a convenient search function to look for the item you want to check. Nonetheless, note that you can’t inspect CS2 skins online using this method, as you still will need to open CS to review the items.

For example, you want to purchase the iconic Desert Eagle “Starcade.” Once you enter the skin’s name in the search, the platform will provide you with all the offers currently on the market.

You can also use “Advanced options” to look for specific wear, stickers, etc.

As you can see, the trading offer name reveals whether this is an ordinary skin or a StatTrak/Souvenir one. Plus, you can see its wear level in the brackets. At this point, your task is to find the item with a price that meets your budget.

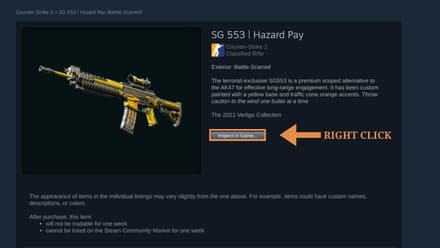
Considering that the Starcade skins are known for their patterns, let’s check out this item’s seed (index) to ensure it's worth the asking price. Click on the offer, and then select “Inspect in Game.” Steam will immediately take you to the inspection mode so you can inspect skins in CS2. Click on the “Info” button and find “Pattern template” to check the skin’s seed.

Inspecting Skins on Third-Party Websites
Although now you know how to inspect skins in CS2 in game, you may also need to do it directly from your browser. Luckily, there are a couple of cool platforms that allow you to do so.
CSFLOAT
This CS2 skin inspect platform is Valve’s official partner. It not only has an impressively large database but also offers a variety of tools, including an online float checker. You just need to paste the inspection link of an item you want to buy, and the platform will provide you with the information about its float, compare it to other similar skins, and show its paint seed.

CSGOSKINS
If you don’t want to inspect CS2 skins in the game, you may visit this fantastic service. It allows you to experiment with the items’ floats and review them in 3D. Furthermore, CSGOSKINS provides information about the prices on all popular markets (including the rating of the third-party platforms).

CS.MONEY
This platform is extremely useful if you want to purchase a knife, gloves, or a gun with a unique pattern. It allows you to inspect CS2 skins and their seeds online so you can compare them with your trading offer.

Conclusion
Now you know how to test skins in CS2 without spending a penny. All the methods described in our guide are absolutely safe for your account and won’t lead to a VAC ban. Also, you’re welcome to check out how to use any knife in a CS2 private match and how to rent CS2 skins to test the most popular guns in the game without purchasing them.


