CS2 Overpass Smokes: CT, T, Mid, A, B
Contents
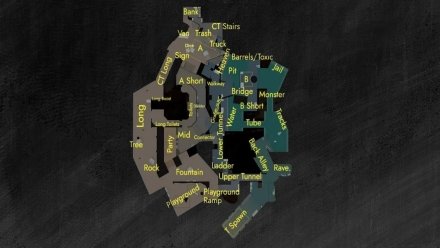
Being not the most popular map in Counter-Strike, Overpass still attracts plenty of fans. However, Valve added it to the list of overhauled CS2 maps and totally reworked it. Although the map's structure has remained the same as in Counter-Strike: Global Offensive, new textures force us to dive into training once again. Luckily, it can be done easily with our CS2 Overpass smokes guide, which contains the easiest lineups and short videos for better understanding and remembering.
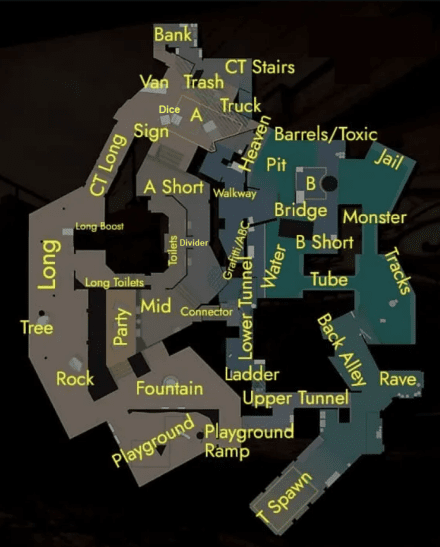
Traditionally, for those pretty new to Overpass, here is a cheat sheet on the map’s callouts:
Overpass A Smokes
Let’s start with the smokes that can be thrown from the A site or nearby positions. Being close to CT spawn, they are mostly used by defenders.
A Long to CT (Trash)
This smoke from the Boost corner can be used for the Bank smoke lineup as well. Of course, with the renewed grenade physics in the game, plenty of Overpass smokes in CS2 can be found for CT to imitate A Site entrance.
A Short to Tube (Pipe)
A Short player can be helpful with his grenades in every map area, blocking the clear vision in many spots. Depending on the particular needs, this smoke can be thrown deeply into the Tube or arrive at the Water and cover a huge area — just go to the training mode and experiment with diverse aiming coordinates.
A Short to Ramp
Usually, CTs try to burn out the Ramp area at the earliest possible timings, but such a grenade is pretty difficult to throw. The smoke grenade is more manageable to land, and including this in your notebook can be good enough to distract opponents.
A Long to Bank
The fight for the Middle and Toilets area can be challenging, and the Long player can come to the rescue. Since the skyboxes are open now, even the Long becomes a place to throw plenty of Overpass smokes, including full A Site preparation from one spot.
Overpass B Smokes
The B bombsite is more popular in Overpass matches, which means more clashes and players near or on it. Here is what smoke you can use being near this site.
B Site Bridge to A Long
While some nades from the A to B Site can be simply thrown, delivering a grenade in the opposite direction assumes the use of jump-throw action. The presented one is quite easy to remember and perfect for imitating A bombsite presence, deserving to be included in your notebook for mid-round usage.
B Short to Heaven
If you know that the B-Heaven is used as the typical Sniper’s Nest by a skillful opponent, it makes sense to cover this position even if you are ready to pick him from the B Short. This CS2 overpass heaven smoke isn’t the easiest lineup and requires a few training attempts to remember the exact spot to aim and jump throw.
Walkway to Monster
The cooperation of the B-Site defenders is one of the cornerstones of successful defense, and this smoke is one of the vital puzzles. Learning one specific Walkway dot you should throw at the beginning of the round is much easier than running to the Monster and throwing smoke on the feelings.
Overpass Mid Smokes
Since the Mid area on Overpass is pretty small, we’ve gathered grenades that can be thrown from it and nearby positions as well.
Mid to Bank
After the fight for the Mid, Connector, and Toilets is won by Terrorists, the attacking team gets an opportunity for further offensive actions. If you are a grenade geek, you’ll surely love this spot near the Bench, which solely opens a wide room for maneuvering and grenade lineups for both bombsites. This lineup for the Bank smoke is easy and stable enough to start A Site execution.
Mid to CT (Trash)
The need to isolate vision for CTs on the Stairs near the Trash box at the beginning of the match is probably the main task for Terrorists, and this position should be the main aim during A-Site executions. Luckily, there are plenty of spots that can be used to throw this smoke, and the Mid area near the Con is among the easiest to remember.
Mid to Dice/Truck
A bench closer to the Divider on the Mid can also be used for another useful lineup but with a left+right-click jumpthrow. It doesn’t require deep A Site execution and provides basic coverage from CTs on the Truck, Trash, and in the Bank. Of course, it can be a perfect option for clutches when the fake smoke arrives at the A Bombsite, while the Terrorist can use the Connector for fast rotation to the B Site. Add to this a potential retake purpose for CTs arriving from B Site via the Con, and it becomes one of the best available smokes on the map.
Mid to Bridge
If there is a spot that is suitable for throwing as many different smokes as possible, it surely should be the Mid area, being the center of the circle, speaking in geometry terms. This time, it’s a lineup for the Bridge and B fake execution, which can be made from the Mid area with a pretty fast taking of the A Site.
Divider to Monster
Supportive roles are surely the hardest in terms of grenades the players should learn, but this re-smoke lineup in the mid-timings from the A Short to the Monster is the easiest to learn. Actually, there have always been plenty of CS Overpass smokes that can be used by support players and help even outside the direct firing area.
We recommend reviewing Inferno smokes in our separate article.
Overpass CT-side Smokes
There aren’t as many CT-exclusive smokes on this map as they’re already in favorable positions in terms of winning chances. That is, there are only two worth noting.
CT Spawn to B Short
This supportive grenade can be used to either help or imitate the B Site presence in clutches. Since the B Short is a pretty narrow zone, the lineup that covers everything around the Sandbags is easy to remember and hard to miss.
CT Spawn to Monster
Since the Monster is the only spot where Ts have pretty equal chances for the fight against CTs in terms of early timings, this is the Overpass Monster smoke that everyone must learn. Of course, the main purpose is to throw it at the earliest timings from the CT Spawn, but it can also be a decent fake option in clutches.
Overpass T-side Smokes
Traditionally, attacking players should use more creativity in terms of utility throwing to neutralize the preferable CT angle holding power. The regarded map is no different, and knowing even difficult lineups is a must for more successful attacks.
T Spawn to Toilets (Restroom)
The Toilets is the key zone in the battle for A Site, and both sides usually try to be active in this area. Ts can start the fight for it in the early timings and cut the vision from the Divide to the Party or from the Long Toilets to the Mid and Connector. Of course, it can be thrown later on the feelings, but it’s better to enter the skirmish more prepared, using walk+jumpthrow and aim as shown.
T Base to Squeaky
The fight for the Connector is probably the most difficult and crucial at the same time. Control over this zone allows fast T-side rotations and the presented Squeaky smoke can make it easier for Ts to grab it at early timings as it cuts the help from the B Short and Water.
Back Alley to Divider
Terrorists often use the Back Alley to prepare their attacks, and there is no surprise this grenade has a double purpose. Thus, it can help teammates at early timings to take the Toilets or be a perfect fake option before starting B Site execution via the Monster.
Back Alley to B Site
Sometimes, it’s enough to deliver only a single smoke to the middle of the B Plant, allowing Ts to play much more effectively near the Pillar and site boxes. This lineup is easy to remember and has a proven almost immediate effect. However, we recommend experimenting with the position of your crosshair and finding other variations that can cover the space between site boxes and the Pillar.
Other Useful CS Overpass Smokes
The latest CS2 update of 14.11.2024 reduced plenty of water from Overpass, but the traditional areas saved their names and purposes.
Water to Heaven
Of course, taking B Site starts from the Overpass Heaven smoke, and this lineup is probably the easiest and is thrown from the Water position. It didn’t significantly change from the Global Offensive times and can be deployed whenever you decide to start B Site execution.
Water to Walkway
Closing the holding view only for the Heavens' spot isn’t enough for successful B Site execution, and the smoke to the Walkway is needed. Luckily, the size of the new smoke allows the use of a single grenade that can isolate both the ABC and Walkway positions and make CTs on the Barrels or in the Pit feel lonely and vulnerable.
Water to Bridge
If you are the one who should enter the B Site from the Water, the smoke to the Bridge is even more vital as it covers the basic crossfire spots in this area. The throwing spot is the same as for the Heaven grenade and is among the easiest Overpass smoke lineups to remember and use every time.
Trucks to Bridge
If you are a monster of the Monster rushes and like fast push tactics, isolating the Bridge can make even more sense than isolating the Heaven position. Thus, the Pillar will cover you from direct sniper picks, while a support player at the Walkway or ABC can be pretty annoying. Combining this one with the smoke to the B Site, Molotov to the Barrels, and a few flash nades can be a nice default lineup to enter the bombsite pretty securely.
***
Knowing grenades is the basis for every Counter-Strike 2 player who wants to play better and improve their in-game impact. Being a CT-oriented battlefield, Terrorists should be real Overpass smokes map kings for successful offense. Of course, CTs also require paying enough attention to smokes, and we hope this guide will quickly make you a better player and teammate.
