How to Change FOV in CS2

Counter-Strike players often customize game settings to improve their performance and get better reaction time. In addition to adjusting crosshairs and finding the best CS2 resolution for their hardware, the pros also experiment with the Field of View (FOV).
If you perfectly configure this parameter, it’ll be way easier for you to spot the enemies first, sometimes allowing you to eliminate them before they even understand what’s going on. So, if you want to add another in-game advantage to your arsenal, let’s find out how to change FOV in CSGO (and CS2).
Understanding FOV in CS2
But before you go and change FOV in CS2, you should get a good grasp of how it can impact your performance. In Counter-Strike, the default Field of View of 60 provides excellent visibility of important gameplay elements and feels comfortable to most players. It offers a good balance between situational awareness and precise aim.
Nonetheless, to keep improving your rank, you’ll have to stop being an average player. Tailoring this parameter to your playstyle is crucial for winning the gunfights at higher levels of play. For instance, making the Field of View wider allows you to spot your enemies faster, which is great for close-range gunfights. Alternatively, narrowing the FOV will make your shots more accurate.
Methods to Change FOV in CS2
So, how can you change FOV in CS2? There are three methods, ranging from relatively simple to highly complex.
Via In-Game Settings
If you’re after the easiest option that requires minimal effort, stick to the quick guide below. You won’t even have to use the console for this one:
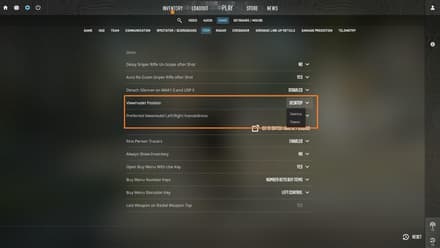
Open the Settings.
- Head over to the “Game” section.
- Go to the “Item” subsection.
Find the CS2 FOV settings and adjust the “Viewmodel Position.” Here, you can choose between two options: Desktop or Classic. The Desktop mode positions the weapon in the center of your screen, freeing some space on the side. The Classic option moves the weapon to the left or right corner (depending on the Preferred Viewmodel Handedness), clearing out the center.


Via Developer Console
Want to dig deeper into customization? You can also experiment with CS2 FOV through console commands. This option is perfect for players experienced enough to know what field of view adjustments they need. If you are one of the old-school CS 1.6 players, this part might bring back some memories. And for the rest of us, press the ‘~’ button to access the console (it is usually located right below ‘Esc’ or left of ‘1’ on the keyboard).
However, you may be unable to use the FOV command if you haven’t activated the developer console first:
- Go to the “Settings” menu.
- Select the “Game” settings tab at the top of the screen.
- Change the “Enable Developer Console (~)” to “YES.”

Now, you can change the Field of View in Counter-Strike through the console, either before the round is launched or even during play. So, how to use your first CSGO FOV command? Open the console and type in the command viewmodel_fov #, finalizing it by pressing “Enter”:

You’ll need to replace the “#” symbol with a number between 54 and 68. We have used 60 in the example above.
By the way, this command also supports float numbers (e.g., 61.52334), letting you really fine-tune your FOV. The lower the number is, the deeper the view of the game gets, resulting in a smaller FOV — a weapon will appear closer to the player's model.
Via autoexec.cfg
If you don’t want to enter the CS2 FOV command every time you enter the game, you can create an autoexec.cfg file (or add the command to the existing one). Here’s how to do it:
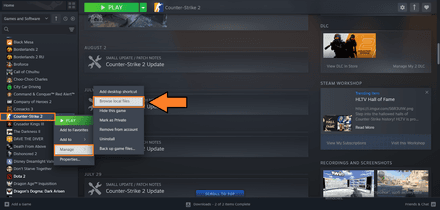
Open Steam and find Counter-Strike 2 in your Library. Right-click the title, select “Manage,” and choose “Browse local files.”
- You’ll be taken to the folder with the game’s files. Follow this path “\Counter-Strike Global Offensive\game\csgo\cfg”.
- Using your default text editor (e.g., Notepad for Windows), create a file, add
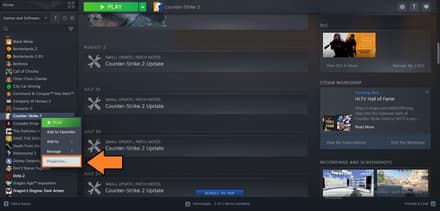
viewmodel_fov #to it (don’t forget to replace the “#” symbol with the number of your choice), and save it as autoexec.cfg. Open Steam again and right-click Counter-Strike 2 in your Library. This time, choose “Properties…”.
In the “General” tab, find “Launch Options” and enter
+exec autoexec.cfg.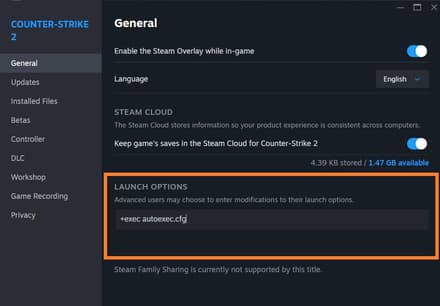


Choosing the Right FOV Value
You probably wonder which parameters to use with your new CS2 change FOV command. The final choice depends on your own preferences, but let’s review the three most popular options.
Default FOV
If you don’t have a specific setting in mind, it might be better to leave FOV alone. The default settings will suit the majority of players, and if you’ve spent a lot of time playing with a specific Field of View, changing it may cause you some discomfort.
Wide FOV
Despite the benefits of the default FOV, some gamers prefer to make it broader. Going for this option will provide you with the following advantages:
- Improved situational awareness;
- Less tunnel vision;
- The illusion of smoother movement and navigation.
At the same time, you'd better get ready for some visual distortions. It’ll be way more difficult for you to estimate the distance to an enemy and, eventually, make an accurate shot. Plus, as your field of vision will be broader, you’ll be receiving more information, which may be difficult to process during dynamic gunfights.
Narrow FOV
Instead of increasing your FOV, you can reduce it to narrow your perspective. In this case, you will get:
- Better aim;
- Lower image distortion;
- More realistic gameplay.
However, this FOV option also comes with its fair share of drawbacks. First of all, it’ll be more challenging for you to analyze the situation in close-range gunfights, as you’ll be less likely to notice the enemy in the first place. Additionally, reduced peripheral vision may cause you to miss threats while navigating the map, potentially leading to an early elimination.
Pro Tips and Settings Recommendations
Now, you know how to change FOV in CS2, and with the help of the tips provided below, you can get even better results. Experiment with these recommendations and CS2 pro settings to elevate your game to the next level.
Use additional commands
You can use various CS2 console commands for advanced FOV adjustments. They will reduce visual obstructions, making it easier for you to spot the enemies and map features. Here is a table with the cheats you can use paired with viewmodel_fov #:
CS2 command | Description |
| Moves the weapon closer to the center of the screen or further to the right (the allowed range is from -2.5 to 2.5). |
| Moves the weapon closer to you or further away (the allowed range is from -2 to 2). |
| Lowers the weapon or raises it higher (the allowed range is from -2 to 2). |
| Expands or zooms in the view (can be only used on private servers with the cv_cheats 1 command turned on). |
Check presets
You can use preset weapon positions if you don’t want to spend a lot of time trying to adjust everything manually. Once again, there are three possible options, all of which you can enter in the developer console:
CS2 preset | Description |
| The best choice for the players who opt for the Desk setup. The command centers the weapon at the bottom of the screen. |
| A more relaxed viewing angle. |
| A traditional layout from classic Counter-Strike. |
Test your settings
The best way to check your adjustments is to test them directly in the Practice mode with the Infinite Warmup option turned on. This way, you’ll have enough time to further adjust your FOV.
Alternatively, you can opt for the Workshop Maps, such as crashz' Viewmodel Generator CS2. On custom maps like this, you can preview your changes in real-time.

Conclusion
Finding the answer to the “CS2 How to change FOV” question is another step toward becoming a pro gamer. Although the majority of the playerbase will probably never adjust this parameter, true professionals adapt their field of view to suit their playstyle. And, of course, don’t forget to adjust your CS2 HUD settings to remove any distractions and stay focused on your opponents.


![Karambit Case Hardened Blue Gem [Guide]](https://profilerr.net/static/content/thumbs/750x410/1/27/jfotbr---c375x205x50px50p--51d2c50942830a7c97464801aa8a7271.webp)


