Most Useful Dota 2 Console Commands

The most common use of Dota 2 commands is to test the latest updates or practice new strategies without risking a match loss. Additionally, console commands offer a greater degree of personalization compared to base settings, and can even improve the game’s performance if you’re playing on an older PC.
With this in mind, we’ve prepared a list of the best Dota 2 console commands to give you greater control over the game. Plus, our guide also includes the cheats you can use in custom lobbies to practice your skills.
How to Enable Console in Dota 2
As you might have guessed, you won’t be able to use console commands until you enable the console. If you just want to try commands quickly read how to enable console in Dota 2 and you will be ready. Here’s how to do it:
- Open Steam and find Dota 2 in your Library.
- Right-click the game and choose “Properties.”
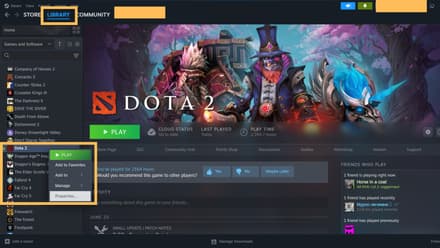
- Select the “General” tab and find “Launch Options.”
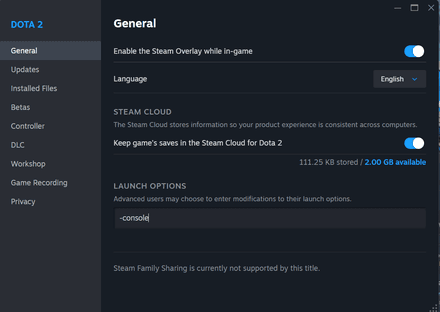
- Enter
-consolein the free space below and click “OK.” You can also add-windowto launch the game in Windowed mode by default. - Verify that the console is enabled in the “Miscellaneous” tab.
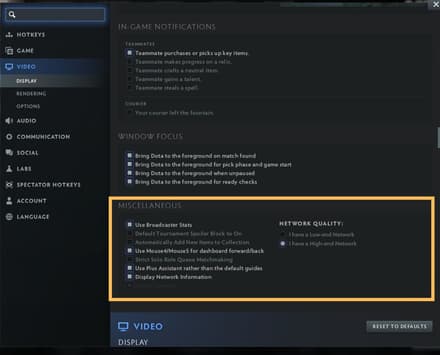
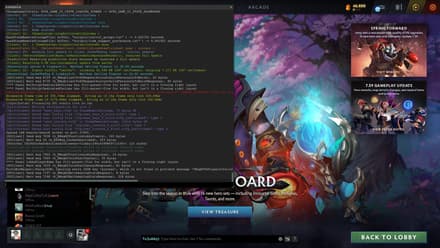
Now, launch Dota 2 and give the console a try. Depending on your keyboard layout, the default console hotkey is either “\” or “~.”
You may want to tweak your settings too try our best Dota 2 settings in 2025 for a smoother experience.
Performance Optimization Commands
If you play on a low-end PC, you can use these Dota 2 console commands for FPS management, graphical adjustments, and performance analysis. By using the console, you can tailor the game to your hardware and get better performance during matches.
Note that when dealing with console commands in Dota 2, the number “1” is used to activate the setting or feature. If you want to turn them off, replace “1” with “0.”
Command | Description |
| Shows real-time FPS while in-game. |
| Activates screen shaking when certain abilities are used (you can turn it off for better performance). |
| Displays comprehensive information about your FPS and network performance (one of the best Dota 2 console commands for ping analysis). |
| Allows you to limit the maximum FPS to get a more stable performance (you’ll need at least 60 FPS to play). |
| Improves connection stability by setting the maximum number of bytes of data per second the host can receive (the optimal number is 30–60 bytes per second). This is one of the few ways to manually lower ping time. |
| Displays ping on the screen while in-game. |
| Determines how the game processes network data, which can give you smoother visuals. Enable this command only if you have a stable Internet connection. If you often experience connection issues, consider disabling interpolation instead. |
| Sets the interpolation time. It’s set to “2” by default, but many players set this property to “1” for a better balance between responsiveness and smoothness. |
| Activates camera smoothing. |
| Makes the game feel smoother by enabling a client-side movement prediction. |
| Disables animated hero portraits to boost performance (set to “1” by default). |
Many console commands work best when combined with launch options so consult our best launch options for Dota 2 to set them up correctly.
Cheat Commands
You can also use console commands in Dota 2 to test new in-game features, new items, or try new strategies in the practice mode. In such cases, these “cheats” can save you a lot of time by giving you access to unlimited gold and XP.
Note that you can only use these highly useful Dota 2 console commands in custom lobbies if their host has turned on the “Enable Cheats” option:
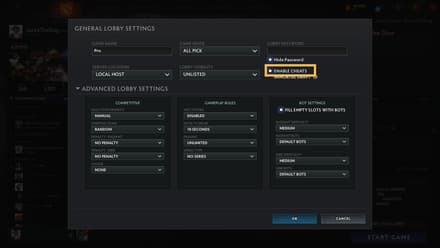
Here’s a list of cheats that can be activated by simply typing them in the chat during the match. Don’t forget to write “-” before each command so the game can distinguish it from an ordinary message.
Command | Description |
| Increases the level of the selected hero by N (maximum 30). |
| Increases the level of all bots on the map by N (maximum 30). |
| Sets your hero’s level to maximum, gives you 3 Divine Rapiers, Heart of Tarrasque, Enhanced Boots of Travel, Daedalus, Aghanim’s Blessing, and Aghanim’s Shard. |
| Reduces the selected hero’s health to 1 HP. |
| Gives your hero N gold. |
| Instantly refreshes cooldowns on all abilities and items. |
| Immediately resurrects your hero. |
| Instantly kills your hero. |
| Spawns lane creeps. |
| Spawns neutral creeps. |
| Destroys all wards on the map. |
| Spawns a friendly hero. If you want to spawn an enemy hero, add “enemy” after the command. |
| Gives you a specific artifact (can be used to receive neutral items, too). |
| Gives all bots on the map the item of your choice. |
| Shows current ping (this chat command is also available in regular games). |
| Skips the preparation phase and immediately starts the match. |
| Teleports a selected hero to the cursor’s location. |
| Activates the WTF mode, which removes mana cost and cooldowns of all abilities and items. |
| Deactivates the WTF mode. |
| Respawns all the trees on the map. |
| Removes the fog of war. |
| Activates the fog of war. |
| Instantly kill all the creeps on the map. Alternatively, you can replace “all” with “radiant”, “dire”, or “neutral.” |
| Disables creep spawn. |
| Enables creep spawn. |
There are also some Dota 2 console commands that can be used only in custom lobbies. Unlike chat cheats, they deal with core features like game speed and camera distance.
Command | Description |
| Activates cheats in your lobby if you’ve forgotten to enable them before starting the match. |
| Changes game speed. For example, if you set the number to 0.5, the game will be slowed to half its normal speed. Similarly, setting it to 2 will make the game twice as fast. |
| Changes the time of day. |
| Allows you to purchase a specific item for a specific bot. |
| Sets your camera distance. Set to 1134 by default. |
| Shows the ping of all the players in the lobby. |
| Disconnects you from the match. |
| Shows the information about your account. |
Customization Commands
You can also use Dota 2 console commands to experiment with the HUD elements like minimap, health bars, and more. As usual, it’s best to try out different combinations until you find one that works.
For example, there are Dota console commands that adjust the size of specific HUD elements, ensuring they aren’t blocked by the visible parts of your streaming software. Additionally, you can minimize unimportant visuals to better concentrate on the match.
Command | Description |
| Allows you to adjust hero icon size on the minimap (set to 594 by default). |
| Makes the game show the range of your spells only when you actually select them. |
| Displays players’ names on the top of their heroes’ health bars (it’s turned off by default). |
| Removes the lines from the health bars (the ones that divide the bar every 250 HP). You can replace “1” with “3” to get the lines back or “0” to remove the health bars entirely (use this to create high-quality screenshots). |
| Changes players’ colors to individual (1) or unified (0). It’s set to “1” by default, and changing this parameter is not recommended if you don’t want to lower your map awareness. |
| Enables/disables autoattacks. When set to “0”, the command turns off all auto-attacks. Setting the parameter to ”1” will make your hero attack whenever possible. Use this command only when playing heroes that require extreme micro control. |
| Allows you to deny allied creeps by right-clicking (set to “0” by default). |
| Governs the lines that appear on the health bar. The number sets the amount of health the lines separate (set to 250 by default). |
| Turns off your minimap. |
| Binds a certain key to a certain action. |
| Returns all bound keys to their default values. |
| Changes the duration of pings on the minimap (default duration is 3 seconds). |
| Reduces flashes in gameplay effects. By default, this value is set to “0,” but you can activate this feature to boost performance and reduce distractions. |
| Hides the mouse cursor. |
| Switches the camera to third-person mode. Useful for capturing cinematic shots. |
| Changes your in-game avatar. |
Communication and Team Play Commands
The list of console commands in Dota 2 for communication is rather limited. While most of these commands are unavailable in standard matches, they are invaluable for creating custom maps, such as Custom Hero Clash or Dota 12v12.
Command | Description |
| Allows all players in the lobby to hear voice messages from each other regardless of the team. |
| Enables voice mode. |
| Disallows a chat between certain players. |
| Sets the amount of time the players can use chat after the match is over (set to “10” by default). |
| Sends a certain chatwheel message. |
| Displays your message to all the players in the match. |
| Displays your message only to the members of your team. |
| Mutes all the players from the enemy team. |
| Mutes all incoming messages during the match. |
