How to Start Streaming on YouTube?
Contents

Streaming on YouTube offers unparalleled visibility and audience engagement for gamers and content creators. With features like high-quality video playback, customizable monetization options, and access to a massive global audience ready to support gaming content, it’s a dream platform for anyone looking to build a thriving online presence. Curious about how to stream on YouTube? It’s not just about hitting the "Go Live" button—preparation and a bit of know-how are key. Of course, this process requires proper preparations and specific knowledge. Follow this guide to set up your channel, attract viewers, and pave your way to success in the streaming world!
Setting Up Your YouTube Channel for Streaming
Before you learn how to live stream on YouTube, you’ll need to prepare your YouTube channel. While the process is straightforward, several essential steps require attention to detail.
Create Your YouTube Channel
Start by logging into YouTube using your Gmail account. This automatically creates a YouTube account, which you can use to watch videos, upload your own content, or start streaming live.
Verify Your Identity
According to YouTube streaming requirements, if you want to start broadcasting your content in real-time, you’re required to pass two forms of verification:
- Mobile phone number: Note that you can only link up to two channels per year.
- Identity verification: Typically, this process takes less than 24 hours.
After a successful verification, in addition to live-streaming, you gain access to the following perks:
- Possibility to upload videos longer than 15 minutes.
- Custom thumbnails to make your content stand out.
Customize Your Channel
Now, it’s time to pay attention to your channel settings. Choose a catchy channel name (it can differ from your Gmail username) and write a compelling description. Also, create a fantastic 800x800px logo and a 2560x1440px banner to give your channel a polished, professional appearance. You can apply all these changes in your YouTube Studio.

Plus, don’t forget to enter the Settings and choose the Channel section. Add relevant keywords related to your main topic in the “Channel” section of your YouTube Studio to help your target audience discover you easily.
Choosing the Right Streaming Equipment
No guide on how to stream on YouTube on PC will be complete without the discussion of essential equipment. Quality matters. The right equipment ensures smooth streams and keeps your viewers hooked. Let’s review the hardware, apps, and Internet speed you need to create ideal streams for your audience.
Hardware Essentials
You have to build a proper YouTube streaming setup if you want your videos to attract the viewers’ attention. At this stage, you’ll need to purchase the following hardware:
- PC or Laptop: Depending on the type of content you want to stream, your PC should be powerful enough to meet your needs. For example, if you broadcast your CS2 matches, your computer should be able to run a streaming app without affecting the in-game performance.
- Webcam: It’s not a secret that streaming with your camera turned on allows you to establish a stronger connection between you and your viewers, as they’ll be able to see your true emotions.
- Microphone: High-quality sound is one of the most essential elements of a successful stream. Make sure that your microphone minimizes the ambient noise and catches your voice clearly.
- Headphones: Prevent echoes and enhance your focus with comfortable headphones.
- Accessories: Finally, you can enhance your setting with RGB lighting, a stream controller, an encoder, extra light, custom neon signs, etc. All these accessories undoubtedly can take your streams to another level and elevate the overall vibe.
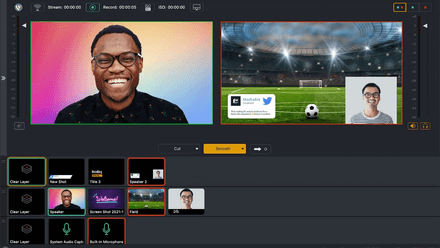
Streaming Software
Dealing with basic YouTube stream settings won’t allow you to broadcast high-quality videos. You need to download a professional streaming app that offers many customization options so you can express your own style. If you don’t know which software to install, check out the following programs:
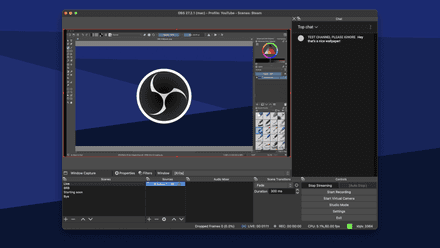
OBS Studio: It is one of the most popular streaming apps, and it allows you to adjust each aspect of your broadcast. Nonetheless, its UI and tools are slightly complicated for beginners.
StreamLabs: A beginner-friendly version of the OBS Studio. Despite more limited customization features, it’s an ideal option if you’ve never streamed on YouTube, Twitch, or other platforms.

Wirecast: This is a medium between the OBS Studio and StreamLabs. The only nuance is that you’ll need to opt for a paid version if you want to reveal the true potential of this streaming app.


Internet Speed
You may use the most innovative software and advanced hardware, but your stream won’t attract the audience if it experiences lags caused by poor internet speed. Thus, you have to check out this metric before you go live. You can test it by asking your internet provider or using tools like Speedtest by Ookla. Consider that your internet speed should be at least 20 Mbps.
Configuring Your Streaming Software
Before you go live on YouTube, you should adjust your streaming app. Here are some short instructions on how to prepare OBS Studio for your first stream, which is similar to any other suitable application.
Install Your OBS Studio
The installation of OBS Studio doesn’t require any special technical knowledge. The application is free, so you can download it directly from the official website. After that, turn on the installer and follow the installation prompts.
Connect OBS to YouTube
Now, let’s connect the application with your YouTube account. Simply follow our step-by-step instructions:
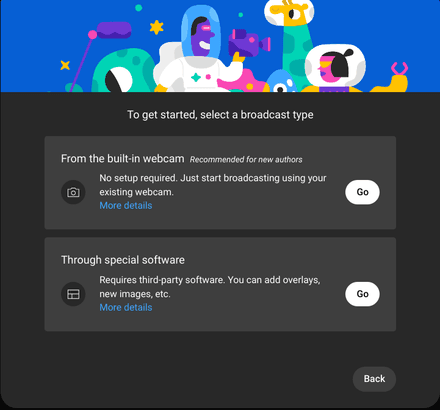
Enter YouTube and select “Start Streaming” in the right corner of the screen.

When the platform asks you to pick the type of stream to begin, opt for “Streaming Software.”
Copy the Stream Key from YouTube’s Stream Settings.
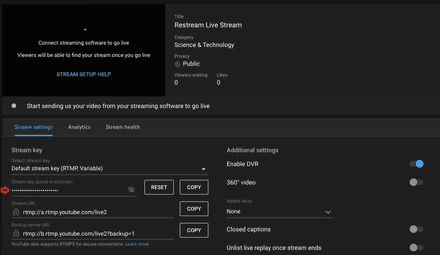
- Open OBS Studio and tap Settings.
Find the Stream tab, choose the Service dropdown menu, and opt for “YouTube—RTMPS.”
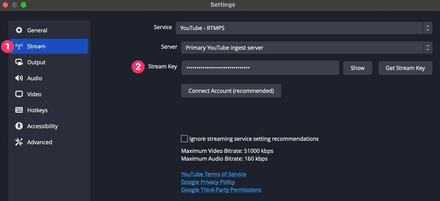
- Select Use Steam Key and paste the key you’ve copied before.
- Apply the setting by clicking “OK.”


That’s how you can seamlessly sign in to your YouTube account to OBS Studio. Additionally, you can always amplify your reach and restream your content on other platforms like Twitch, opening up opportunities to engage a broader audience.
Prepare for Your Stream
When you launch OBS Studio for the first time, it automatically optimizes video and audio settings based on your hardware. However, you can always tweak these configurations manually to better suit your preferences and needs.
You can check the audio level in the Audio Mixer section and manually select your audio sources in Settings (Audio tab). When it comes to video, you should add a video source in Sources (near the Scenes dock). Just right-click inside the box and choose the desired video source:
- Game Capture: allows you to stream the video from a specific game you’re currently playing.
- Window Capture: Displays activity that happens in non-game apps.
- Video Capture Devices: Streams video directly from your webcam.

Feel free to enrich your stream with overlays, images, videos, or text using the corresponding video sources. However, ensure that these elements don’t distract viewers from the primary content you stream.
Going Live on YouTube
Now that you’re equipped with the know-how to enable live streaming on YouTube, it’s time to put it into action. Follow these final steps to make your stream stand out.
Create an Engaging Title
YouTube allows you to create a title and description for your stream. It should be both aligned with your topic and captivating. For example, instead of using the generic title “I Play Minecraft,” opt for something more intriguing and accurate like “Survive Horror Minecraft World...”

Add Thumbnails and Tags
A thumbnail is the picture a viewer will see before they click on your stream. Thus, it must be attractive and bright. A compelling thumbnail (recommended size:1,280x720 pixels) can significantly boost your stream’s click-through rate. Additionally, don’t forget to select the category that matches your content, include relevant tags to enhance discoverability, and adjust audience settings accordingly.

Personalize Chat
YouTube allows you to adjust simple chat settings. Decide whether you want to enable chat and record it. You can also set up access to your chat, turn on reactions, and choose the delay between messages sent by a user.

Choose Stream Privacy
Finally, define whether the stream is Private (ideal for checking up on everything), Not for everyone (private livestreams with links to share), or For everyone. If you plan your online event later, choose the date and time when you want to go live.

Start Streaming via YouTube Studio
You can start live streaming via YouTube Studio or your YouTube channel by just pressing a Broadcast button. Also, you can stream your content after clicking Start Streaming in OBS.
Monitor Your Stream
You can oversee your stream’s performance in YouTube Studio. There, you can watch the quality of your video, track the number of viewers, and engage with the chat. Be aware that delays between your broadcast and YouTube Studio updates are normal.

Engaging with Your Audience During the Stream
Audience interaction is key to building a successful streaming career. It also helps you avoid violating YouTube live stream requirements.
Read Chat
Always read the chat and actively participate in discussions. Respond to the most interesting messages and, of course, don’t forget to show gratitude to your audience for every gift or donation.
Enhance Interaction with Tools
The good news is that apps like OBS allow you to add any interactive feature to your stream. For example, you may set up a bot that will read a message if your subscriber makes a donation or create fun GIFs triggered by donations or specific events.
Moderate Chat Messages
It’s important to keep an eye on the messages your viewers write in chat. Offensive messages could trigger algorithmic violations of YouTube live requirements. In this case, your channel may be at risk of suspension.
Post-Stream Tips
Now, you know how to start streaming on YouTube. However, even when your broadcast ends, there is still work to do to maintain your channel’s growth.
Archive Streams on Your Channel
After streaming, YouTube will offer you to archive your content and add it to your channel as an ordinary video. It’s a good idea to save a broadcast, as it’ll help you grow on the platform.

Highlight Key Moments
It’s not enough just to know how to go live on YouTube on PC. You should also think about how to get new subscribers, increase overall audience, and maintain engagement. It’ll be a good idea to highlight the best moments from your stream and save them as Shorts.
Analyze Stream Performance
You can review your stream analytics even when your broadcast ends. Use this information to find out your strong and weak sides. For example, if you discover that many viewers consistently drop off your stream at a particular moment, try to figure out the reason that has triggered their reaction. Afterward, come up with a solution to this issue by making necessary adjustments for future streams.
Monetizing Your YouTube Streams
Many people are interested in not only how to start a live stream on YouTube, but also how to make money on this platform. Here, you can find some useful tips.
YouTube Partner Program
You should meet not only certain requirements to stream on YouTube, but also conditions that will allow you to join the platform’s Partner Program:
- Gain more than 1,000 subscribers.
- Accumulate 4,000 watch hours within a year.
- Maintain a clean record without penalties on the platform.
Once eligible, YouTube enables ad placements in your videos for revenue generation.
Leverage Donations and Sponsorships
It’ll be a great idea to encourage your audience to donate to you via different services like Patreon, Buy Me a Coffee, or Donatty. Plus, you can offer various sponsors to advertise their goods for a certain fee.
Utilize YouTube Monetization Tools
When you join the Partner Program, YouTube will offer you the following monetization tools, which you can use to create alternate sources of income:
- Channel Memberships.
- Super Chat and Stickers.
- YouTube Shopping.
- BrandConnect.
Troubleshooting Common Streaming Issues
Even though YouTube enables live streaming in the easiest way, you may still face some technical issues. Luckily, there are simple ways to solve them!
Fix Streaming Lags
As a rule, all lags are related to a poor internet connection, so you may disable all the devices that share your internet connection. The issues may also be caused by outdated hardware, and in this case, you may need to buy a new laptop or PC.
Address Audio and Video Problems
A broken or poor-quality webcam or microphone can significantly affect video or audio input. The same problem can also be caused by outdated drivers, which lead to inappropriate functionality. If that's the case, update them on official websites.
Consult YouTube Support Resources
The good news is that you can always opt for YouTube Support Center, where you can find a solution to almost any issue. Plus, don’t forget about different community forums for comprehensive solutions to technical challenges, where you can also get valuable tips on how to go live on YouTube.
***
Now that you have all the tools and insights, it’s time to hit the ground running! Follow our instructions, keep improving, and stay consistent in your streaming activity so that one day, you finally earn that prestigious Diamond Button. Good luck!


