How to Create Your Own Map in CS2

Do you want to unleash your own imagination and leave your mark on the development of the Counter-Strike community? Now’s the perfect moment to discover how to create your own map in CS2 and captivate fellow players with your designs.
In this guide, we’ll walk you through all the important processes, from setting up tools to publishing your digital content on Steam Workshop. Follow the steps from our CS2 map creation guide to turn your vision into a real masterpiece!
Requirements for Map Creation
Before you learn how to build a map in CS2, you should ensure your hardware and software are ready for the upcoming creation process. Here is a list of the requirements you must meet to start working on your own project:
- Counter-Strike 2 installed: This is the most important requirement in our CS2 custom map tutorial. The game must be installed on your PC. Without a ready-to-play game on it, you won’t have access to its engine or essential features.
- Hammer Editor: Like DOTA 2 and Warcraft, Counter-Strike also features a built-in editor. Thus, you need to download Valve's in-house level editor for Source 2 titles. Make sure your Hammer version is at least 4.x if you want to use it to develop maps for Counter-Strike 2.
- Hardware Requirements: Your PC must meet the minimal requirements of the editing software. Here, it’s essential to ensure that your GPU is capable of raytracing, which is necessary for Hammer’s functionality. The recommended specs include Nvidia GeForce RTX 2060, AMD Radeon 6600 XT, or Intel Arc series GPUs. If you want to enjoy enhanced editing features, opt for Nvidia GeForce RTX 2080 Ti+ or AMD Radeon 6800 XT+. Plus, your hardware must be able to run CS2 smoothly.
Set Up the Hammer Editor
Now, let’s kickstart your map-making journey and get to the CS2 map editor setup! This process is easier than ABC because you just need to take the following steps:
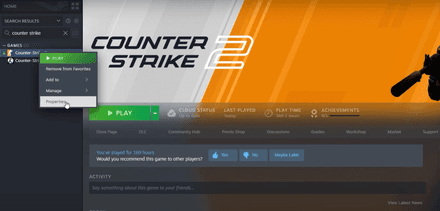
Open Steam, locate Counter-Strike 2 in your Library, right-click the title, and select Properties.
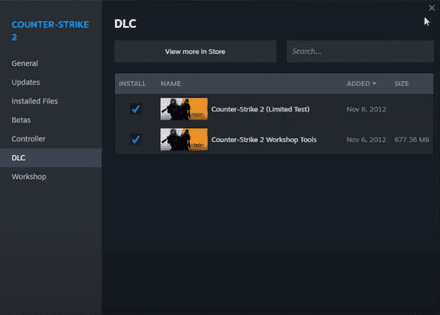
Click the DLC tab and enable Counter-Strike 2 Workshop Tools. Wait until the software is downloaded and installed.
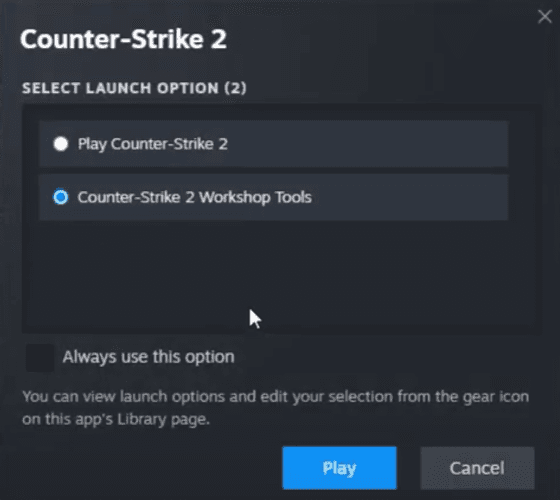
From now on, every time you run CS2, Steam will give you the option to open a game or enter an editor.
The software opens a tiny window, allowing you to create your first map by clicking the Create New Addon button. Come up with a name for your project and confirm the creation.
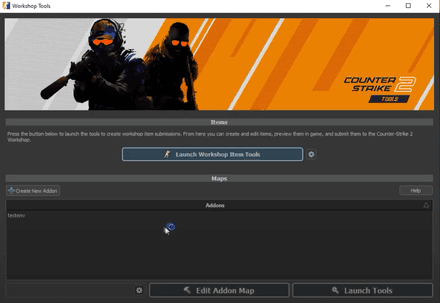
Double-click your project to open it. Once it’s launched, choose Hammer (Map Editor) from the tools menu.


It’s essential to watch the CS2 Hammer editor tutorial on YouTube to get familiar with the interface and numerous tools offered by this software. Also, learn its UI, which includes:

- 3D Viewport: Located in the center of the editor, this window allows you to review and edit your map.
- Tools: The left side includes different tools such as Selection Tool, Translate Tool, Tile Editor, etc.
- Selection Modes: On the upper left side of the editor, you can find the Selection modes, which you can use to define the selected element.
- Selection Sets: This window on the right side displays all the objects on your map.
- Tool Properties: This pan is located under the Selection Sets. It shows the unique properties and commands of a selected tool.
You can also add other windows in the Settings to customize the software according to your needs. At the same time, it’s not recommended to overwhelm the UI with numerous panes.
Design Your Map Layout
Although now you know how to create your own map in Counter-Strike, you probably still wonder what you should do to bring your vision to life by turning an empty void into a jaw-dropping location. As a rule, everything starts with planning, during which you should consider the following CS2 map design tips:
- Try to avoid large empty spaces and frequent repetition of the same objects or buildings, as it could dampen the player’s engagement.
- Strategically place spawn places and pathways to different points on your map. Try to calculate the time both teams need to reach the meeting points (areas where the CT and T sides meet each other).
- Think about where to place sniper nests, weapon zones, bomb sites, and camping positions. At the same time, ensure that the map layout provides both teams with advantages in specific areas.
- Keep performance in mind—the bigger your map is, the more advanced hardware it requires to run smoothly.
If you want inspiration to create a truly exciting map, you may opt for a so-called “four-square” layout, which you can find in such popular locations as Dust 2. It’s simple yet ensures exciting gameplay with balanced team advantages.

The Principle of the Four-Square Layout
This popular layout guarantees both engaging gameplay and balanced team dynamics. With a limited number of routes, players can navigate the map without feeling overwhelmed or lost during a match. At the same time, there should still be enough space for the implementation of various tactics. The bomb sites are typically placed in the corners of the square, while the CT spawn is located between them, on the upper or lower layer of one of the corners. Also, it’s essential to come up with several route crossovers.

Implementation of a Four-Square Layout on Dust 2
Remember that layout is one of the most critical factors that define your map’s success. Whether you're designing a bomb defuse or hostage rescue scenario, adhering to the principles we've outlined is essential for creating a well-balanced and engaging experience.
Placing Entities and Objects
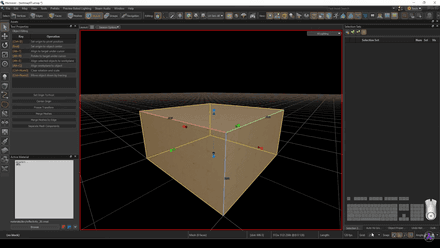
Did you know that Valve’s game designers typically start by building “orange maps”? These maps are barebones layouts without texture, focusing solely on the fundamental structure of the map: only the main object. This approach allows developers to thoroughly test key locations and gameplay dynamics before adding visual elements.

To add the first object on your map, follow our CS2 map making step-by-step process:
- Save your map by clicking the namesake option in the File menu.
Use the Block Tool to create your first mesh (it looks like a big box) and adjust its size by moving the red, blue, and green arrows.
Add a player spawn by clicking the Player Start button in the Entity Tool.
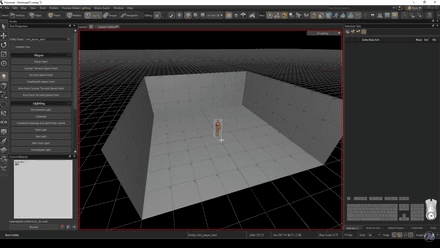
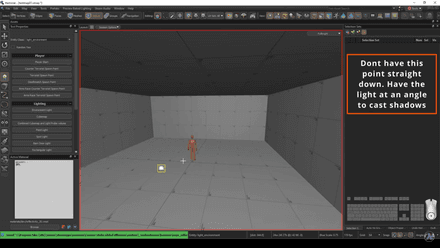
Insert lighting sources with the same tool.
If you want to replace the ceiling of the room, choose the Faces section and look for Skybox material there. Select the ceiling and press Shift+T to apply the chosen material.

Find
dev_measuregeneric01.vmatin the Faces section. Using the Shift-T combination, apply it to the walls to make them orange.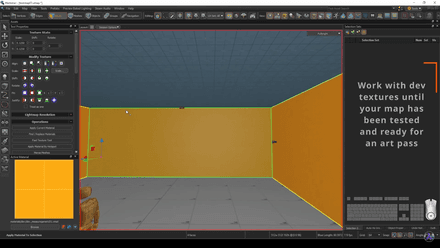
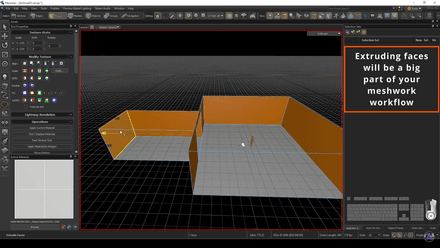
Use the Edges and Faces to edit the walls, expanding your room. For example, you can cut a wall in half by pressing V in the Edge mode. Also, you can move each part of the wall by dragging the arrows in the Transform mode (press T to enter it).


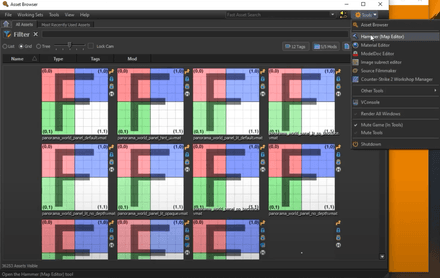
These are the basic tools you have to learn to use if you want to become a skillful designer of CS2 maps. For example, try to create a hall with three simple routes leading to another hall. As soon as you understand how the mentioned elements work, you’ll be able to change their shapes dynamically using the Arch tool, populate your map with objects via the Asset Browser, and even add unique spaces for team intros. The good news is that you can find a lot of YouTube tutorials and community forums that can help you master each feature of the Hammer Editor.
Test Your Map
No CS2 map development guide would be complete without such an important stage as testing your in-game location. It is non-negotiable in map creation. The truth is that you may easily miss a bug during the editing process. Thus, it’s essential to test each corner of your map before publishing it in Steam Workshop.
So, what is the best way to resolve these problems? Open your map in Counter-Strike 2 and spawn 20 bots using the bot_add command. Don’t take part in the match between the two teams controlled by AI. Wait nearly an hour to figure out whether your map is well-balanced. If you notice that one side constantly wins, you should come up with significant changes to the design of some locations and reduce the advantage of a stronger team.
Additionally, play the map in a solo mode to spot collision issues or texture glitches. Pay separate attention to the interaction of your character with various objects and walls on your map. As soon as you finish your test, return to the editor and fix the bugs you discovered. And if you feel like you’re stuck and don’t know how to deal with the problem, you can always seek help from the Valve Developer Community.
Optimize for Performance
CS2 map building process requires constant work on your project if you want it to attract thousands of players. When it comes to performance optimization, it’s essential to remember that not every gamer uses powerful hardware to play their favorite online shooter. And your map should run smoothly on all types of PCs in case you don’t want to get negative reviews.
One of the most effective ways to check and boost performance is by conducting Visibility optimization (VIS). Without VIS, all objects on your map will render continuously, regardless of whether they are visible to the player. Of course, it can severely impact the gaming experience, even for those with powerful setups. To ensure your map excels in performance, adhere to these tried-and-true recommendations to successfully pass the VIS test:
- Ensure that all detail brushes were used appropriately.
- Place func_viscluster to optimize visibility in large areas.
- Opt for 3D Skybox to reduce sky size.
- Try to add more corridors and rooms. At the same time, avoid open areas with a significant amount of objects that will be rendered at once.
- Remove all the unnecessary models as they create additional load on hardware.
An intriguing aspect of Source 2 is that it doesn’t include traditional hint brushes, func_details, and area portals. This means you might need to relearn how to optimize VIS almost from scratch, even if you’re experienced with map creation in Source 1.
For best results, test your map on multiple computers to evaluate FPS performance. As soon as you strike the perfect balance between map size, detail density, and smooth gameplay, you’ll be all set to move forward with the next step in our Counter-Strike map creation guide.
Finalizing and Compiling Your Map
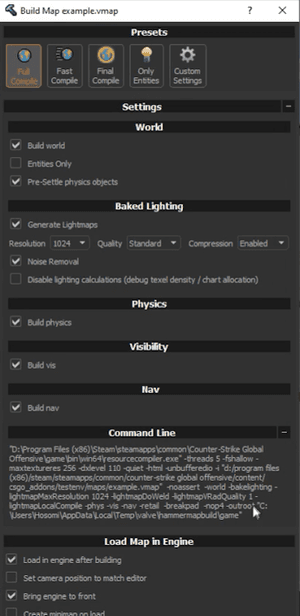
Now that you know all the intricacies of the CS2 create custom maps feature, it’s time to compile your masterpiece. All in all, there are five types of compiling offered by the Source 2:
- Full Compile: Using 1024 lightmap resolution and Standard quality, it compiles physics, VIS, audio, world, navigation, and lighting. This type of compilation isn’t ideal for final releases.
- Fast Compile: Perfect option if you need to swiftly check your map in the game. It doesn't generate lighting, VIS, and audio.
- Final Compile: When your map is ready for release, choose this compilation type, as it’ll ensure great quality for your final release.
- Only Entities: A sure choice if you need to fix map clipping or out-of-bounds exploits without a full recompile.
- Custom Settings: It allows you to conduct custom compilations. Consider that if you change anything in the compile types from above, the Custom compilation will be set automatically.
Unfortunately, you may face a Stalk Detected problem. As a rule, it happens because your hardware isn’t designed with a raytracing-capable GPU.

If you want to deal with this issue, follow this Counter-Strike map making step-by-step solution:
Copy the text from the Command Line of the Settings from the Compilation menu.
Paste the text to the Windows Command Prompt and add
-lightmapcpu. Hit Enter.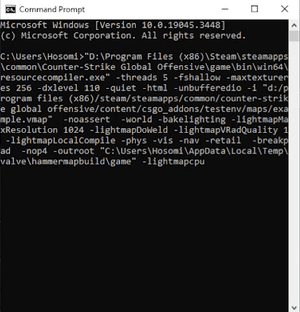
- Your map will be compiled, but this process may take days.


Publish Your Map
Finally, you’ve discovered everything about how to build a map in Counter-Strike, and it’s time to showcase your masterpiece to the world. Open your project and choose Counter-Strike 2 Workshop Manager.

Click the + icon, and fill in the information about your map, including its title and description. Don’t forget to add a high-quality in-game cover image.

Once you’re done, hit the Submit button to make your map available to the community. Now, you can officially launch your map in the game!


