How to Check Ping in Dota 2

In Dota 2, where split-second decisions and precise timing can define the outcome of matches, maintaining low ping is essential for an enjoyable and efficient gaming experience. This guide will walk you through how to check ping in Dota 2, outline optimal ping levels for seamless gameplay, and share practical tips to reduce ping for a smoother overall experience.
Optimal Ping in Dota 2 for a Comfortable Game
Ping, measured and highlighted in milliseconds (ms), represents the time it takes for your device to communicate with the game server. Low ping ensures quick responses, while high ping creates delays — the frustrating "lags" every gamer dreads.
For a smooth Dota 2 experience, aim for an average ping below 50ms, which allows seamless real-time actions, such as initiating abilities or dodging attacks. A ping of 100ms or higher can significantly disrupt your gameplay, leading to FPS delays, miss hits, mistimed skills, or poor team coordination.
Example:
- Low ping (30ms): You see an enemy approaching and can immediately react by using a stun or retreating.
- High ping (120ms): By the time your stun activates, the enemy has already moved out of range, leaving you exposed.
All that said, keeping your ping low is a must for an enjoyable Dota 2 experience. Wondering how to see ping in Dota 2 in order to check your network latency and take measures? Let’s figure it out.
How to Check Ping in Dota 2
Up to date, there are two quick and easy ways to show ping in Dota 2, both quite simple and accessible directly within the game without any extra software digging or other beating around the bush. Let’s take a look through both available methods.
#1 In-game Display Method
This method uses the game’s built-in network metrics display, which you can switch on from the Advanced Options menu:
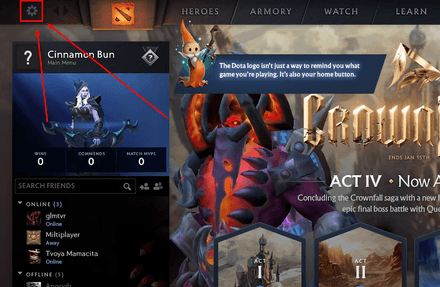
Go to the Settings menu:
Navigate to Options -> Advanced options":
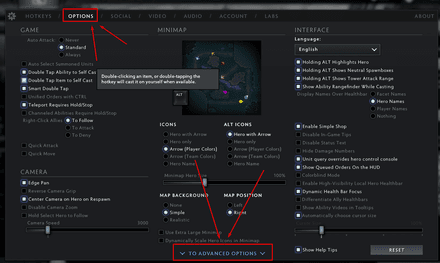
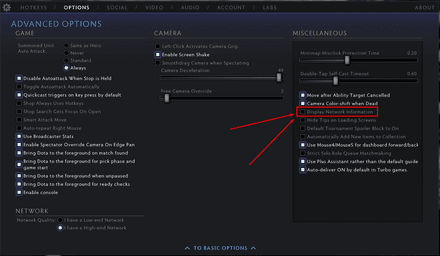
- View the Advanced options section and take a look at the rightmost panel — Miscellaneous.
Make sure the Display Network Information option is ticked and enabled:
- That’s it! Now, jump into the game and see the results.
From now on, such useful network information as your relevant ping, the FPS, and the data packet loss incoming/outgoing rates will be indicated in real time in the top-right corner of your in-game HUD:
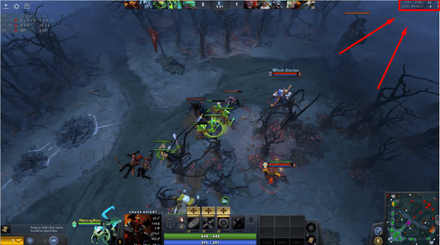

Here they are, neatly indicated for the player to see at all times, and take measures if the ping spikes up too high.
#2 Console Command Method
For even more precise information on your ping, there is another method, albeit a slightly more technical one — to use the Dota 2 ping command in the game console. Before you do anything, make sure the console is enabled in your game in the first place:
Repeat the route and head to Options -> Advanced options":

- Now, take a look at the first, leftmost bar Game options;
Look for the Enable Console near the bottom of the list and make sure it is checked:
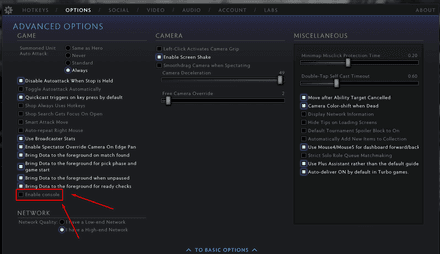
Now that you’ve got the console activated, you can learn how to check ping in Dota 2 console for utterly precise indications:
- Launch Dota 2 and hop into a match.
- Hit \ (default key), which is usually located above the Enter, or your custom key to open the developer console.
Type
statusin the console and press Enter.- You’ll see your ping, along with packet loss stats for all players in the match:
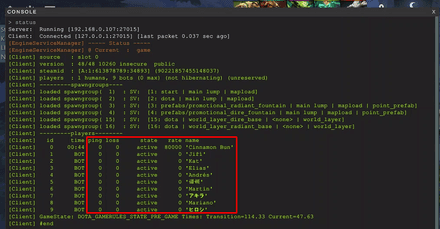
This method stands out in that the developer console provides a much more detailed outlook, showing ping and packet loss for all players in the match with precise timing. This is, by far, the most advanced and direct way on how to check your ping in Dota 2.
How to Reduce Ping in Dota 2
If you're struggling with high ping, surely you can use some of these tried-and-true tips on how to iron things out and keep your Dota 2 gameplay smooth:
Choose the right Network Settings
First off, you may have easily missed out on this option, but Dota 2 actually has a network connection quality toggle hidden in the Advanced Options:
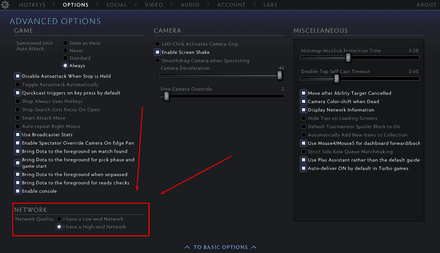

Toggle the setting in line with your connection speed (anything under about 50 Mb/s is the low-end category). However, you could also try switching to a low-end option if you are experiencing high ping issues, even on a high-speed connection. This may help balance server distribution and smooth things over for you.
Go Through Other In-Game Settings
Dialing back certain in-game settings, such as graphics and resolution, can help free up resources for smoother gameplay. Many players have managed to crank up their FPS and tone down ping issues just by clicking off some shadows or effects.
Close Background Applications
Streaming services or downloads running in the background can also hog your bandwidth. Shut down unnecessary apps to free up resources and make sure that Dota 2 gets the lion’s share of your network.
Update Network Drivers
Don’t let outdated network drivers drag you down. Double-check and make sure that everything is up-to-date, and if needed, reinstall them to sort out potential performance hiccups.
Use a Wired Connection
Still not getting anywhere? Try switching out your Wi-Fi for a wired Ethernet connection. This swap can lock in more stable and consistent speeds, and cut back on ping spikes, giving you a more seamless gaming experience.


