How to Play Counter-Strike 2 on Mac: 2 Simple Ways
Contents
- Will CS2 Be Officially Available on macOS?
- Ways to Play CS2 on macOS — (It Is Possible)
- Using Windows App Emulators for macOS
- Launching CS2 on MacBook Using CrossOver Emulator
- 1. Visit the Codeweavers website and choose the paying plan.
- 2. Install CrossOver on your Mac, drag it to Applications, and launch.
- 3. Find the Steam app and install it.
- 4. Go through the typical Steam installation process and sign in to your account.
- 5. Go to Library, find Counter-Strike 2 in the search bar, and install the game.
- 6. Exit Steam, return to the CrossOver, and activate/check a few settings options.
- 7. Reopen Steam and go to CS2 before-launch Properties.
- 8. Set Launch Options for smoother game performance.
- 9. Run the game, and set the Video setting to Low for easier processing.
- 10. Launch a test map with Bots and enjoy the game.
- What are The Best Emulator Programs for Playing CS2 on MacBook?
- CrossOver
- Whisky
- Parallels/Boot Camp
- Common Challenges You May Face Using Emulators & How to Solve Them
- Low FPS
- Freezing and stuttering
- Crashes, black screen after launching
- Glitches and lags
- Mouse acceleration problem
- Cloud Gaming Services (Step-by-Step Guide for GeForce Now)
- Common Challenges You May Face Using Cloud Services & How to Solve Them
- High latency
- Lags and Freezing
- What MacBook Models are Able to Support CS2?
- FAQ
While the release of CS2 is widely regarded as the upgrade of the well-known game franchise, MacBook owners have become entirely disappointed. It is officially confirmed now — Valve decided to exclude macOS from the list of operating systems that support a popular shooter. However, it doesn’t mean that Counter-Strike 2 on Mac is unreal, as we'll describe a few reliable methods to play the game in this guide.
Will CS2 Be Officially Available on macOS?
Apple laptop owners were disappointed when they didn’t see macOS as the supported operating system during the CS2 release on September 27, 2023. They perceived it as a glitch or a temporary misconduct and waited for one of the regular updates for the CS2 on Mac problem to be fixed.
However, Valve came up with the statement in the Steam FAQ section that they didn’t see the reason to develop CS2 for macOS computer users as they are only a 1 percent minority. The same approach was applied to the 32-bit Windows systems and DirectX 9, which won’t work with the Source 2 engine. Still, official statements are only about playing as the macOS owners used to, and we’ll show you how to play CS2 on Mac using diverse methods.
Ways to Play CS2 on macOS — (It Is Possible)
So, the main reason why it’s impossible to play CS2 on a MacBook is because of the differences between macOS and Windows and how they process video in games. Thus, most game developers use Vulkan API, which is easily connected to Windows and Linux, but the Apple operating system cannot directly connect. Instead, macOS visual processing is built around Metal API, and Valve simply didn’t want to decode their game for Apple-linked video processing API.
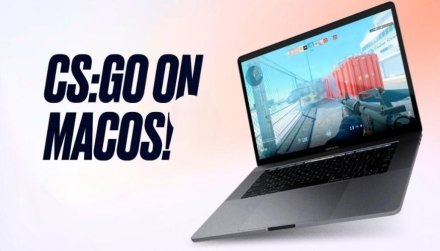
Still, there are two simple ways how to play Counter-Strike 2 on Mac:
- Emulators
- Cloud Gaming Services
Both allow you to overcome the graphical problem and make the game available on MacBooks, so let’s review them in more detail.
Using Windows App Emulators for macOS
In general, Windows application emulators adjust video processing for Apple’s Metal API, making it on the go. In other words, you must install additional software to connect diverse graphics APIs to run CS2 on Mac.
With plenty of such solutions on the market, let’s review CrossOver as the basic one, as it allows us to install Counter-Strike 2 on a MacBook with any CPU chip. On the contrary, the Whisky emulator works only with Silicon chips (M1 and M2), while Parallels, VMWare Fusion, and Boot Camp help to cope with Intel CPUs only.
Launching CS2 on MacBook Using CrossOver Emulator
As we stated above, CrossOver is the universal tool that can help resolve the issue of how to play CS2 on a MacBook independently of the CPU nature (Intel or Silicon). Let’s review the process as a step-by-step guide:
1. Visit the Codeweavers website and choose the paying plan.
Open the Codeweavers website, choose the Free Trial plan (if you’re not sure about paying for a subscription), and download the installing file.
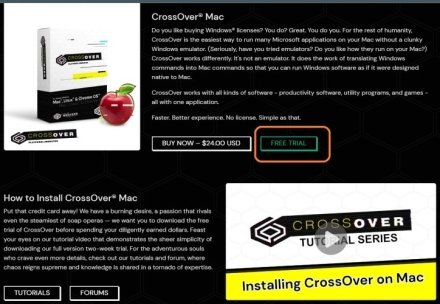
2. Install CrossOver on your Mac, drag it to Applications, and launch.
After installing the latest version, drag it to the Applications. When you launch CrossOver for the first time, the system will ask if you are ready to open the file downloaded from the Internet — agree and Open it.
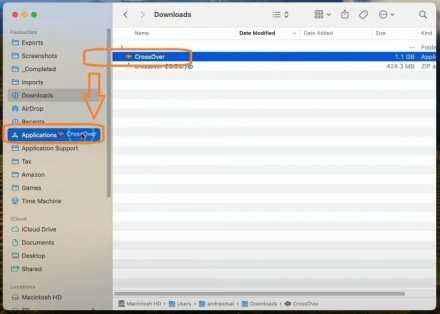
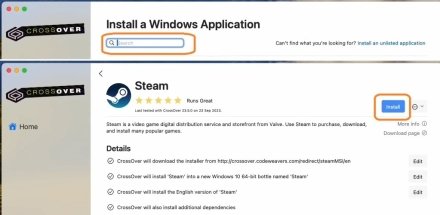
3. Find the Steam app and install it.
Type 'Steam' in the search bar, move to its main page, and click the ‘Install’ button.
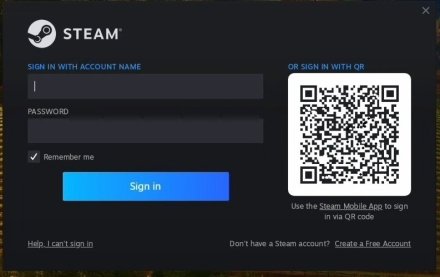
4. Go through the typical Steam installation process and sign in to your account.
The gaming application will start installing into a new bottle, so proceed with all the typical confirmations, choose the needed language, etc. Once Steam is updated to the latest version and ready to open, type your credentials or scan a QR code from your Steam Mobile App to sign in.
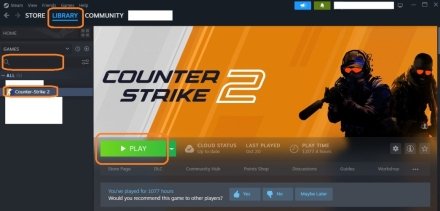
5. Go to Library, find Counter-Strike 2 in the search bar, and install the game.
This step is needed for those who don’t know how to install CS2 on a MacBook. You’ll see a big blue button named ‘Install’ instead of a green one with ‘Play.’ Click on it, choose the directory for game files, and wait until the game downloads.
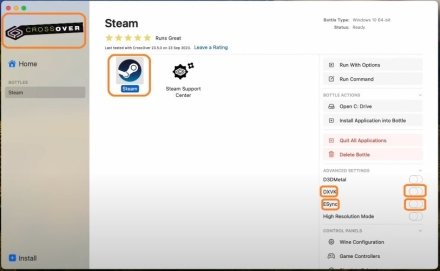
6. Exit Steam, return to the CrossOver, and activate/check a few settings options.
Choose the created bottle (Steam in our case), and look at a few options in the right part of the screen. Activating ESync and DXVK are highly recommended options that should make gaming smoother. Still, you can experiment and pick D3DMetal instead of DXVK or turn off ESync (don’t forget to exit Steam before those changes) and check how the gaming process goes with a new approach.
7. Reopen Steam and go to CS2 before-launch Properties.
Even the owners of powerful gaming rigs should make this step, as CS2 isn’t regarded as an optimized game. So, let’s choose settings that can help to cope with the game even before it launches. Go to Library, right-click on Counter-Strike 2, and choose Properties.
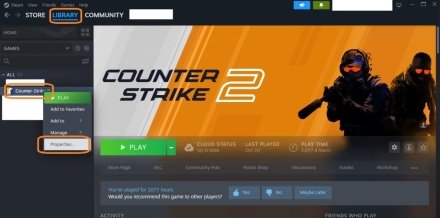
8. Set Launch Options for smoother game performance.
Scroll down while being in the General tab and find the Launch Options. In the required field, type/paste the following text, and close this menu.
-novid -nojoy +cl_forcepreload 1 -high
So, here is what those commands mean:
-novid — skips the intro video so as not to overload the system during launching;
-nojoy — deactivates the use of the gamepad (joystick), saving pre-reserved resources;
+cl_forcepreload 1 — forces the game to download shaders and textures before the map is launched, helps to decrease freezes when running to the new map location;
-high — sets a high priority of the game, so the MacBook dedicates maximum hardware resources for CS2.
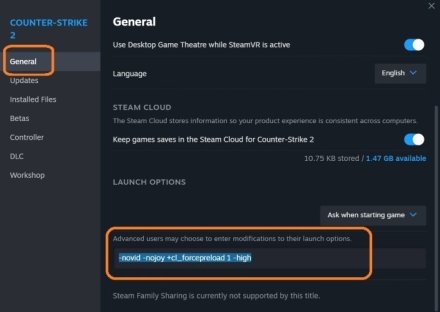
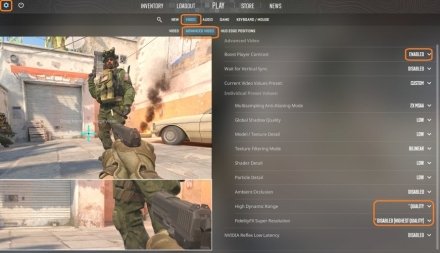
9. Run the game, and set the Video setting to Low for easier processing.
Before you play Counter-Strike 2 on Mac, you need to set your graphics settings to Low. You should start by changing the resolution to the smaller one, then go to the Advanced Video and set all except highlighted parts to a Low or Disabled state.
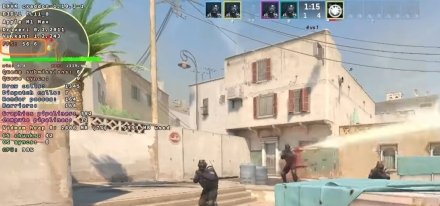
10. Launch a test map with Bots and enjoy the game.
Launch the map with Bots to see the result and check the gameplay for FPS, freezes, lags, and other potential troubles. (As you can see on the screenshot, 50+ FPS is real).
Once you've got Counter-Strike 2 running on your Mac, enhance your gameplay by exploring CS2 pro settings used by the top players.
What are The Best Emulator Programs for Playing CS2 on MacBook?
Now that you know how to run Counter-Strike 2 on macOS devices, let's find out the best programs for this purpose. Although Apple MacBooks are positioned as devices for working, many Mac owners like to spend some time playing games. To avoid buying a separate gaming rig, uploading additional software and enjoying a favorite shooter in playable conditions is better.
Depending on how you download Counter-Strike 2 on Mac and launch it, third-party software can be divided into a few categories. Let’s review three main ones that can be used to play CS2:
CrossOver
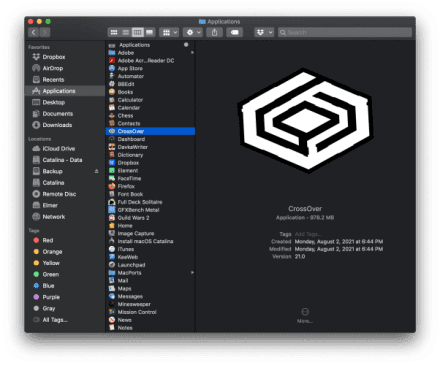
This app represents the most flexible family of emulators, which allows you to download CS2 on Mac built on either Intel or Silicon CPUs. As described in the guide above, CrossOver is a separate app that allows launching programs and apps developed for Windows. The rate (around $50-60 per year) is probably the biggest drawback, although it works pretty stably with other games as well.
Whisky
Compared to the previous option, Whisky is a free solution. However, it requires being more attentive during installation and spending more time on optimal settings. Another drawback is that Whisky works with Silicon chips only (M1 & M2) and Sonoma OS, reducing the number of laptops it can help with CS2. Still, the free status and regular updates can be helpful for many seeking how to play CS2 on macOS.
Parallels/Boot Camp
These two apps represent the oldest and the longest ways to play CS2 on Mac, as they start from installing Windows OS (virtually or really). However, they work only with Intel CPUs and don’t guarantee the best quality, although they try to cope with video decoding on the lower level. At the same time, they aren’t adjusted for the CS2 issues on Macs, focusing on the wider pool of emulation tasks.
Common Challenges You May Face Using Emulators & How to Solve Them
Since emulators aren’t the native software, it's no surprise that plenty of problems may occur even when installing Counter-Strike 2 for M1 Mac and trying to play on the modern Silicon chip. Independently of the emulator, ways you launch Counter-Strike 2 on macOS, or your MacBook type, the problems and their solutions can be grouped in the following way:
Low FPS
Facing FPS below 50 is a tragedy for any Counter-Strike version gameplay, and having lower numbers for CS2 can make the game unplayable. In this regard, you should use the described above Launch Options, reduce Video settings to Low, or try to change the video processing settings of your emulator (turn on/off ESync, DXVK, and D3DMetal for CrossOver). Also, don’t forget to close unneeded applications on your Mac to decrease CPU/GPU/RAM workload and check your internet connection for ordinary latency.
Freezing and stuttering
Those are pretty common issues when running the game or a map for the first time, as your Mac faces new textures, models, animations, and shaders from scratch. Sometimes, it’s okay to play for a few minutes until your hardware adjusts for the new graphics, but if not — look at the steps in the previous section.
Crashes, black screen after launching
Plenty of users reported crashes during the game or even before launching the game homepage, which is the problem with video processing. Check if your hardware is suitable for playing CS2 (the table at the end of the article), try reinstalling the game and/or emulator, or follow the steps from the ‘Low FPS’ section.
Glitches and lags
Those effects can occur even with a pretty stable framerate, but the potential solutions are similar to when you need to improve the FPS.
Mouse acceleration problem
If you feel that your mouse reacts inappropriately, you can try to exit your game and include the -nojoy command in the Launch Options. If not, try to use third-party software (LinearMouse, Smooze Pro, SteelSeries ExactMouse Tool) to adjust your mouse settings and synchronize it with the game.
Cloud Gaming Services (Step-by-Step Guide for GeForce Now)
Being on the market for quite a while, Cloud Gaming and Computer services have already passed some evolution processes and adjusted for the market needs. Thus, some Cloud Services allow playing even paid games with having only a subscription to the Cloud Service itself. However, game developers felt a drop in purchases and excluded such a feature.
Now, most services simply work as remote computers or servers, which run the game on remote hardware, providing clients with the final picture just like online video services. With such an approach, the only bottleneck is the Internet connection and final latency, which can negatively impact the gaming process.
At the same time, the requirements for your MacBook are as low as supporting Full HD video on the Internet without lags, which is not a problem even for 10+ years old Macs. You don't even need to learn how to download CS2 on a MacBook, as all the games are already pre-installed on remote rigs. All you need is to have the needed game in your Steam collection.
The most popular Cloud Gaming and Cloud Computing services are:
- GeForce Now
- Paperspace
- Shadow
- Playkey
- Boosteroid
Let’s review the process of how to launch CS2 on Mac in more detail, using the market leader — Nvidia-powered GeForce Now (GFN) service:
Find GFN Service and register on it.
Type ‘Geforce now’ in your favorite browser and open the website with the following URL ‘https://gfn.am/en/.’ Find the button ‘Register and play’ and pass the typical procedure.

Choose a preferable payment plan.
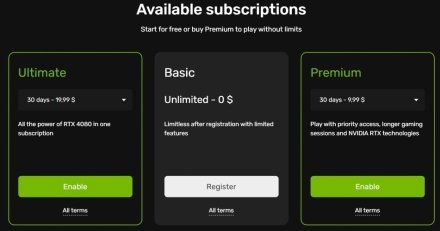
There are three types: Basic, Premium, and Ultimate. You can easily start with the Basic one to get the first impression, which will give limited playing time (up to 1 hour). A more detailed overview of the other ones will be below.
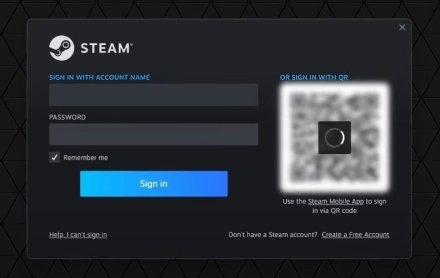
Install the GFN App or use the Browser version; Sign In to your Steam account.
Of course, a dedicated app allows you to have lower latencies and smoother gameplay since web browsers are pretty heavy as of 2023. Whatever you choose, Sign In to your Steam account and download CS2 if needed.
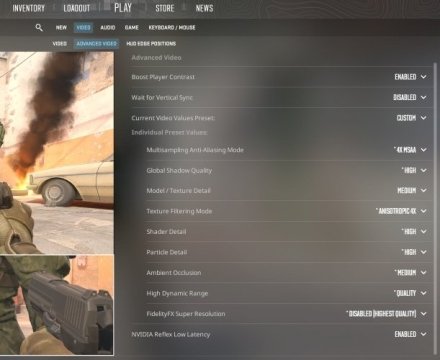
Launch the game and set optimal graphics settings first, then run the game.
If you are using a basic subscription, downgrade the graphics setting in the Advanced Video tab of the in-game menu. It is needed because Free trial remote servers use a pretty old GTX 1060 graphics card, and FPS can drop below 50 if you use high settings. For the Premium subscription (they use GTX 3060 or 2080), you can easily use the following graphics settings:
Common Challenges You May Face Using Cloud Services & How to Solve Them
High latency
Since high latency is the only bottleneck when using Cloud Gaming Services, you cannot significantly reduce it and get below 15 ms even via paid subscriptions. Also, remember that diverse Services offer different latencies, so double-check your conditions and Internet connection.
Lags and Freezing
If your Mac is pretty old (has less than 8 GB RAM and less than 4-core CPU), it’s better to close all other active apps to allow GFN to take all resources.
What MacBook Models are Able to Support CS2?
Without official support from Valve’s side and with the need to use external apps, will Counter-Strike 2 be on Mac in the needed quality? In fact, there is no direct reply to this question, and you should test your Apple laptop in either configuration to get a proper answer.
However, we can use simple logic and analytics to define which MacBook models are suitable for CS2 playable launch. Thus, Valve stated the following technical requirements for the hardware:
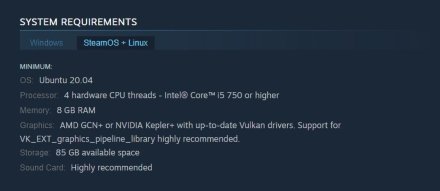
Knowing that Emulators and similar apps cut about one-third of the max FPS because of on-the-fly video transformation, we can assume that weaker Macs should be excluded from the list of those supporting CS2. However, Cloud Gaming Services come to the rescue as they need a laptop ready to cope with online Full HD video, which is not a problem for many old models.
All in all, we added to the table below the most popular models starting from 2013 and divided them into two categories: acceptable for Cloud Gaming and using Emulators. Of course, better models will cope with Cloud Gaming even better, but we haven’t stated them twice to exclude any confusion.
Model | Processor | RAM, GB |
Cloud Gaming Services | ||
MacBook Air (Mid 2013) | Intel Core i5 (2 cores) | 4 |
MacBook Pro (Late 2013) | Intel Core i5 (2 cores) | 8 |
MacBook Air (Early 2014) | Intel Core i5 (2 cores) | 4 |
MacBook Pro (Mid 2014) | Intel Core i5 (2 cores) | 8 |
MacBook Pro (Early 2015) | Intel Core i5 (2 cores) | 8 |
MacBook Air (Early 2015) | Intel Core i5 (2 cores) | 4 |
MacBook Retina (Early 2015) | Intel Core M (2 cores) | 8 |
MacBook (Retina, 2016) | Intel Core m5 (2 cores) | 8 |
MacBook Retina (2017) | Intel Core i5 (2 cores) | 8 |
MacBook Air (2017) | Intel Core i5 (2 cores) | 8 |
MacBook Pro (Two Thunderbolt, 2017) | Intel Core i5 (2 cores) | 8 |
MacBook Air (Retina, 2018) | Intel Core i5 (2 cores) | 8 |
MacBook Air (Retina, 2019) | Intel Core i5 (2 cores) | 8 |
MacBook Air (Retina, 2020) | Intel Core i3 (2 cores) | 8 |
Windows App Emulators | ||
MacBook Pro (Early 2013) | Intel Core i7 (4 cores) | 8 |
MacBook Pro (Mid 2015) | Intel Core i7 (4 cores) | 16 |
MacBook Pro (2016) | Intel Core i7 (4 cores) | 16 |
MacBook Pro (2018) | Intel Core i7 (6 cores) | 16 |
MacBook Pro (Two Thunderbolt, 2019) | Intel Core i5 (4 cores) | 8 |
MacBook Pro (2019) | Intel Core i7 (6 cores) | 16 |
MacBook Pro (Two Thunderbolt, 2020) | Intel Core i5 (4 cores) | 8 |
M1 MacBook Pro (2020) | M1 (8 cores) | 8 |
M1 MacBook Air (2020) | M1 (8 cores) | 8 |
M1 Pro MacBook Pro (2021) | M1 Pro (8 cores) | 16 |
M1 Max MacBook Pro (2021) | M1 Max (10 cores) | 32 |
M2 MacBook Pro (2022) | M2 (8 cores) | 8 |
M2 MacBook Air (2022) | M2 (8 cores) | 16 |
M2 MacBook Pro (2023) | M2 Pro (12 cores) | 32 |
M2 MacBook Air (2023) | M2 (8 cores) | 8 |
FAQ
Yes, you can play Counter-Strike 2 on M1 Mac using a couple of methods, including Cloud Gaming Services or Emulating tools.
The most universal (fits MacBooks built on Intel and Silicon CPUs) emulator is CrossOver, while M1 or M2 Mac owners can also try the Whisky app.
The CS2 FPS on MacBook using an emulator depends on numerous factors, including emulator settings, in-game graphics settings, and basic laptop hardware set. If you have the most recent models, you can easily achieve 60+ FPS at all times.


