CS2 Interp Settings & Commands

CS2 interpolation settings govern the game’s client-server interactions, and so have a huge impact on your gameplay. In this guide, we will tell you everything you need to know about these so that you can adjust your game and avoid poor hit reg, dying behind walls, and other similar issues.
When Should You Change Interpolation Settings in CS2?
First, you need to determine whether your CS2 interp settings should be changed at all. That's very simple to figure out. Just ask yourself these two questions:
- Have you ever felt like your bullets hit the opponent but dealt no damage?
- Are player models lag to the point they are harder to hit because of it?
If you’ve answered “yes” to either, the chances are your interp settings are messed up.
What are Interpolation Settings & How Do They Work in CS2?
Simply put, CS2 interp commands are the settings that are responsible for movement smoothing and prediction. Given that each player on a server likely has a different ping time, it is simply impossible to refresh all their data with the same speed. This causes a mess when registering hits and model movement. Cl_interp commands negate these server-client interaction issues by delaying the game’s response to the players’ input by a few milliseconds. This delay allows the server to make the game comfortable for players with different ping times while also not affecting gameplay in any meaningful fashion. To achieve this, Interp settings in CS2 predict what a player might do in the milliseconds between updates from the server, making the game look smoother and less choppy.
Let’s go through the list of cl_interp CS2 commands and discuss how they function in more detail.
cl_interpregulates the interpolation time (the one that’s responsible for movement prediction) when the server can’t send the updates on time. The higher this value is, the less delay time there will be. However, keep in mind that with that value being too low, the model twitching will get even worse. The default number here is typically set to 0.1 or 100 ms delay, meaning what you see on screen is one-tenth of a second behind what's actually happening.
Interpolation applies to everyone in the game, and while smoothing out visuals, it creates a small delay to nullify the ping difference between players. This delay can theoretically affect your performance in high-level matches, so you better look into the topic if you’re serious about joining the pro scene.
cl_updaterate(default value=64) is a server-side parameter that stands for how many updates the server sends to the client per second. The higher the value, the smoother the game gets. However, you’ll need a good enough connection to receive a higher number of updates on time.cl_interp_ratio(default value=2) is responsible for the interpolation balance. It is used alongside cl_updaterate to calculate the interpolation time using the formula:
cl_interp=cl_interp_ratio/cl_updaterate
For instance, if cl_updaterate=64 (64 updates per second), and cl_interp_ratio =2, cl_interep will equal 2/64=0.03125 (the default settings).
cl_cmdratedefines how many updates the client sends to the server per second. Increasing this value enhances the registration of player actions, but it once again requires a fast and stable connection.
How to Adjust Interp Settings in CS2?
Now, let’s talk about how you can change these settings.
Console
First off, you need to find out which values work the best for you, and the console method is ideal for this. Start with opening the developers console with the Tilde ‘~’ key and checking which settings you currently have by entering the cl_interp command without setting any value.

You can then change your interpolation parameters, and launch a practice match to see whether there’s any noticeable difference. You’ll probably need to repeat the process several times to find the values that work for you. Note that these settings won’t be saved if you set them in the console, so you’ll have to adjust them manually every time you play. However, there’s a solution.
Autoexec
Once you determine the perfect interp values for your setup, you can set them as the default by adding the commands in your autoexec.cfg. If you don’t have one, or you don’t know what it is, don’t worry. It’s just a text file with CS2 configurations that players can access and modify at any given time. The default path to autoexec is:
SteamLibrary\steamapps\common\Counter-Strike Global Offensive\game\csgo\cfg
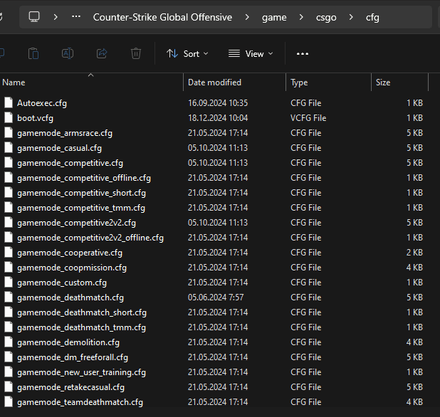
You’ll need to create a text file and place it inside the directory. After that, you can add commands to that file and save it using any name you want (we suggest Autoexec).
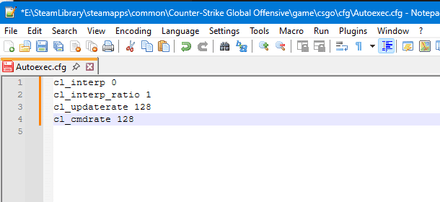
Make sure to use the .cfg file extension instead of the default .txt.
After that, you’ll need to go to your Steam Library, find Counter-Strike 2, right-click on it, and choose Properties.
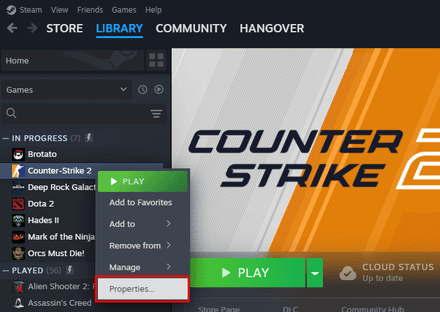
In the Launch options, add +exec Autoexec.cfg command.
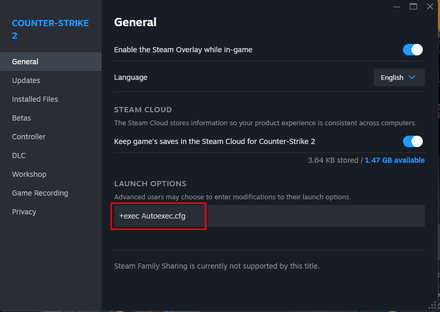
And you’re good to go!
Recommended Interp Settings
Let’s go through the recommended CS2 interp setting. The basic formula for casual players goes like this:
- When playing on official servers, give the defaults a go;
- On servers with higher tick rate, try out
cl_interp_ratio 1,cl_updaterate 128, andcl_cmdrate 128; - If you have high ping and experience problems with hit reg, setting cl_interp_ratio to 2 might solve the issue;
- If you have an average ping of less than 30, you can disable interpolation adjustment (
cl_interp_ratio 0).
For pros and competitive players, the most common settings are:
cl_interp 0;
cl_interp_ratio 1;
cl_updaterate 128;
cl_cmdrate 128.
That’s it for our today’s CS2 interpolation guide. Hope you find it useful! If you have any questions left, feel free to ask in the comments!
